Friday, March 19, 2010

A Button for Punishment

I am a complete novice at jewelery making which leaves me wondering why I keep coming back to it. It's right up there with counted cross-stitch when it comes to fine motor-skill annoyance and crafts from which I get derive no pleasure.

However, I was walking through Joann's fabric store and saw some lovely over-sized buttons and immediately thought of a friend of mine whose birthday is coming up very soon. I thought that she'd really like to be able to wear those cool buttons and my only answer was jewelry.

The buttons were already 50% off so they made a really inexpensive focal point for, say, a necklace. I purchased two and some beads and began to work on them. I started with the prettiest, an ivory-colored button with a flower carved into it. I used silver wire in lieu of thread in the button holes. It was kind of sticking out the back too much so I thought it would help to lightly hammer the wire down.

The button shattered. (I tried to replace the button yesterday, but there were several blank spots in the ivory button racks so think that's a sign that she only needs one necklace from me)

I moved on to the next button and through much trial, error and advice came up with this. I applied a circle of felt with hot glue to the back of the button to cover the wire and keep it comfortable to wear. Despite being completely frustrated with the task, I'm quite happy with the result and hope that my friend likes it as well.

-C

Wednesday, March 17, 2010

March Snow Showers bring Fabric Flowers

It snowed this weekend. But I was in the mood for flowers. So, I used Cami's Sizzix and some super cool wool fabric that I got from my mom's stash and I made some fabric flowers. I met a girl in my neighborhood a few months ago that was wearing a fabric flower similar to these. I asked her how she made them and she kind of explained it to me. So, I thought I would do my version and see how it turned out.
For these flowers you will need 6 flowers. We cheated and cut the flowers out on the Sizzix with a flower die. You could trace and hand cut the flowers if you want. I am using different colors in my sample flower so that you can see the layering easier. Step 1: Take your first two flowers and off set them. Using a needle and thread, just pull the need through from the back. Step 2: Fold the other 4 flowers in half (I ironed mine for the picture, but don't do that. You want them to fluff up). Step 3: Layer the flowers like you would fold closed the top of a box... turning a quarter turn for every flower. Step 4: Put your layered flowers on top of your other two flowers and pull that needle through the flowers again. Sew a couple of stitches through to make sure you get every layer. Step 5: With that threaded needle still in your flower, sew a button in the middle.
Now, my multi-colored flower is a little wonky... but kind of cute. But let me show you some of my cuter flowers. Gotta love my mom's stash of fabric!!! -Anisa

Monday, March 15, 2010

My On-Going Project

Ever since we moved into our current home (just over two years ago) I have had a craft room. It's just a non-livable space that the hubby granted to me and I've been really happy about, but it has never been decorated or organized or anything special.
I got tired of that a few months back and have been trying to make it a comfy, cute place where I'm not completely embarrassed to have Angie or Anisa come and craft with me.
It has not been easy.
Little things help, like Anisa recovering a cute chair (here along with a spray paint tutorial) for me and giving me a matching lamp that doesn't fit her decor any longer, but ther real issue is clutter and so much crafty stuff that I don't know what to do with it all! Yikes!
I have before pics that i'm not quite ready to share yet, but here is the first thing I did for my room to add some personality.
I love playing with words so I thought it would be fun to make cross-word puzzle looking wall decor.
I used Making Memory's Simply Fab foam stamps and simple acrylic craft paint. The letters are just under 3" in height, I believe.
I used two pins and a thread with a level to give me a guide to follow and did the long, horizontal phrase first. The rest was just eye-balled.
I love it.
I love it because it didn't cost me anything, but time, as I already had these supplies for scrapbooking.
I love it because it's a piece of me in a room of my very own. How's that Virginia Woolf?
So, I have a lot more that I'm going to be posting about my craft room improvement in the upcoming weeks (months? Yikes!) so keep a look-out for those. Lots of fun!
-C

Friday, March 12, 2010

Kreative Kuts

As many of you know, I have been holding wood craft classes in my home for a few months. A lot of my crafts are my original designs and I have been working on getting the patterns on a website to sell. So, I am just starting, but I have put my Easter patterns up on a website. My website is Kreative Kuts!!! Right now I only have a few spring patterns up, so click on "SPRING" at the top of the site. The patterns are all E-patterns. You can purchase the pattern through Paypal and I will email the pattern to you. I also have the unfinished wood up for sale as well. If this is something you are interested in, check it out!!!
-Anisa

Tuesday, March 9, 2010

Scripture Bag

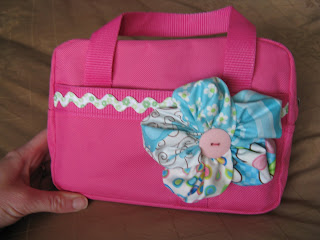
My daughter was baptized into our Church on Saturday. My husband and I gave her her first set of scriptures and a scripture tote. I picked one up at Seagull Book (a Utah based store) for $5. Here it is:
Cute color. Definitely girly, but lacking in personality I think. Using the fabric flower I did here (tutorial found here) with fabric in my stash and some ric rac I had on hand, her bag no longer lacks personality.
I also did the ric rac on the back.
Everything is sewn directly to the bag by hand. I was able to get it completely finished in just a couple of hours. (Less if you don't have to stop to get kids from school and feed them ;)

Monday, March 8, 2010

My vintage mom

I love my mom. She is a funny person. She saves everything... and I mean everything. She's not that old (she'll be 60 this year). But she loves old stuff.... like antiques and always has. This past weekend we went to see my mom and I was telling my boys that she has boxes of my old halloween costumes (yes, they are already starting to plan what they want to be for Halloween). So, we immediately starting getting out the Halloween boxes. We found an old bug costume, dracula cape, jack-o-lantern, etc. But then we found a box with shoes in it!!! It's a good thing my mom and I wear the same size. Now I have 3 new (old) pair of shoes that I get to wear and I love them!
I also raided her fabric and have plans for fabric flowers, zipper flowers, etc. Stay tuned....

Thursday, March 4, 2010

Easter Wood Craft Classes

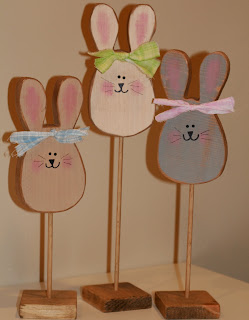
I hope you like what I came up with for our Easter Classes!!! If you don't live near me and would like to purchase wood... finished or unfinished, please email me at anisascholes@gmail.com. Dates: Tuesday, March 16th 10am-noon Thursday, March 18th 6-9 pm Saturday, March 20th 10am-noon Bunny with Egg: $18 Chick: $15 (can be put on a yard stake) Bunny Trio: $10 (stands are $5)

Swimsuit Alteration

About 5 years ago on a little getaway with my hubby, I bought my first 2 piece swimsuit. I've only worn it that weekend and maybe once or twice since them. It's such a cute bathing suit, but I have to say I felt a little uncomfortable in despite the fact that it was a tank top instead of a bikini one. With a trip to a warm and tropical location coming up and without the kids, I thought I'd risk pulling that old suit out. I tried it on and still felt uncomfortable, but thanks to all the great posts different crafters have done on clothing alteration I felt not only the inspiration to make my own alterations but also the courage to try it! Here's what I started with (I apologize in advance for any and all wrinkles you may see): See that little gap between the top and the bottom? Not so pretty on a mother of 3. (At least not me.) I headed to the fabric store to check out their Lycra selection and found just the color I needed to add a few inches to the bottom of my tank. I only purchased 1/3 of a yard and probably could have gotten away with 1/4 yard. What I did: 1. Unpick the hem around the bottom of the tank. If the holes from the seam are too big, you may have to trim the fabric just above the hem. Mine turned out just fine, though. Iron flat. 2. Lay your fabric down and your tank on the top edge. Follow the natural flow of your top to cut out your new piece. Don't forget to add a little extra for seam allowances. 3. You should have two pieces of fabric now. Sew the sides together and fold in half, seams inside. 4. Pin your new fabric band to the suit, matching side seams to side seams. 5. Using a stretch stitch (check your owner's manual), sew together. The stretch stitch will allow for extra movement and will prevent all your hard work from coming apart the first time you use your newly altered swimsuit. 6. Iron again with seams pointing up. If you are lucky to have a Serger or at least have access to one, you can serge your raw edges for a more finished look. Here's what I ended up with: It was a quick, inexpensive refashion and bonus-no swimsuit shopping this year!! (BTW-It was so much more comfortable to wear on the beach and swimming. )