Showing posts with label Recycled Craft. Show all posts

Friday, January 21, 2011

Nothing a little Appliqué won't fix

I have 3 boys... I pass their clothes down. My oldest son had this lovely jacket from his elementary school last year... Well, it's a nice jacket, but he doesn't go to school there... plus it doesn't fit him. So, my second son inherited it. I thought I would try to do a little appliqué to cover up the words. I first appliquéd the star... I wanted something subtle, so I went with a gray and black plaid scrap that I had. Then I appliquéd a guitar over the star. To give it a little pizazz, I did a little zigzag stitch in bright blue over the whole thing. It turned out totally cute!!! And my little boy loves it... my hubby was even impressed. -Anisa

Sunday, January 16, 2011

Repurposed Twin Bed.... Bench!

A few months ago, a twin headboard and footboard showed up in the garage. I asked my mom what she was doing with them and she said... "making a bench." She began to explain to me that the headboard is the back of the bench, the footboard becomes the sides... so it sat for awhile... and finally this weekend I got my hubby to help me make it into a bench. The first thing we did we measured how deep we wanted our bench to be. We wanted it to be 18" deep, so we measured 18" in from each side and marked the wood. We then cut the footboard to length. We then attached the two footboard pieces to the headboard to form a bench.... And we needed a place to sit. We used some scrap 1x4's that we had laying around. Make sure your bench pieces are sturdy because.... well, they have to hold your weight. We wanted our bench to be about 18" off the ground, so with our design, it worked out to screw the wood into the top board from the bottom.... it all depends on the style of your bed. Now I have to paint it.... -Anisa

Tuesday, June 22, 2010

Bathroom Make-over Part 1


I have long been a huge fan of Becky Higgins and all of the scrapbooking glory that comes with her.  (Especially since she is the one who introduced me to the idea of sketching first!)  She has also shared lots of inspiration for other projects with me and hundreds upon hundreds of other fans, including spray painting ordinary, neutral-colored decor bright friendly colors. 

I have these cute frames that I love.  (Purchased at Tai Pan Trading a few years ago for about $3 each)


They were so pretty against the green wall in my last house, but against the very light tan wall in our current house, they just get lost.  I've been dying to try the spray paint thing.  This seemed like the perfect project for this, but just couldn't justify the $5 per can price for the colors I wanted.  Since, they're just small frames, I hit my local Robert's Arts and Crafts and picked up a few bottles of acrylic paint (on sale!) in the perfect colors. Once home, I gathered a few other supplies and got to work.


After a little sanding, my frames were ready to paint.  My original thought was to do 2-3 coats of paint and then sand.  One coat in, I was smitten with the washed looked it had.  I thought it would be perfect in my Hawaiian-inspired bathroom.  When my one coat was dry, I did do a little sanding.  The blue frame really needed it and just made the frames stand out a bit more overall.  Here's the finished project:


(Sorry for the glare!)

I'm excited for the next one on the bathroom to-do list and will share when it's completed.

~Ang~

Wednesday, February 17, 2010

Angie's Door and Anisa's Mom's Headboard

A few years ago, my mom got a new front door. She loved her front door tons and didn't want to just get rid of it, so she had my little brother make it into a headboard. It's pretty cute, isn't it? After I met Angie, I found out that she had the same front door. That's kind of crazy, isn't it? So, here is a before picture of the headboard/door. I love doors... especially fun ones like these!!! I would love to find a cool old door to make into a corner bookshelf for my kitchen!!!

Wednesday, July 22, 2009

Two Cute Skirts

I've got a couple of cute skirts for the little girls in your life. Although, you could easily alter either for a mom-size version if you wanted.
The first is a twirly skirt designed by my friend Toni. She said she was happy to share the directions here with all of you. How cute would this look with some calf length leggings and a t-shirt with a big floofy flower pin or hair accessory?! (Yes I like to make up words. And spellings.)
To make this, first take the circumference of your little gal's waist and times it by 2. This will give you the width for the top of the skirt.
Cut 16 triangles out of 4 different fabrics. (I opted to 3-it's not quite as fluffy, but I couldn't find a matching 4th piece )
To figure out your triangles: waist x 2 (40 inches for me). Divide by 16 (number of triangles). This will give you the top measurement of your triangles. (Sophie's was 2.5 inches) The times that by 3 for your bottom width (7.5 here). Confused? It's okay. Keep reading. It'll make sense.
The length is up to you. I wanted my skirt to hang to the knees, so I did 12 inches.
Now that we know the size of our triangle-we're ready to cut! I started by cutting out rectangles 12 inches (my length) by 7.5 (my width).
Next I marked off the top of the triangle at 2.5 and 5.
Cutting from the top markings to each corner will give you your triangle.
Sew your triangles together to make your skirt. (Optional: surging or doing a French seam will give you a nice clean look.)
Round the corners of your skirt so you don't have points on the bottom. Hem as usual. (Toni did a rolled hem on hers.) Now set aside.
Then make your waistband by measuring the new width from the top of skirt. Cut that length by twice the width of your elastic. Be sure to add a little extra to sew waistband to skirt!
Sew the ends of your waistband together to make a tube. Fold in half WRONG sides together. Pin to skirt.
Sew waistband on. Leave an opening to add elastic. Thread elastic through, sew edges together and top stitch to finish off.
This was a fun project and a great way to use some fun fabrics from my stash! Feel free to email questions to twiddlethumbs@rocketmail.com
Skirt #2 is from Make It and Love It and featured on U Create. My soon-to-be 2nd grader and her BFF will be wearing these the first day of school. Get the free tutorial here. You could also combine the two skirts and make this one.
Is there a support group for skirt addicts? I am LOVING this!

Friday, March 20, 2009

Felting and Fingerless Mittens

In her book Felt It! Stitch It! Fabulous, Katheryn Tidwell Bieber teaches her readers how to take old sweaters made of wool, angora, etc., felt them and make them into something entirely different. Felting, by simple definition, is agitating a woven animal fiber item in hot water and dish soap in a washing machine which allows the fibers to tighten and interweave further, so much so that the item can be cut without unravelling.

The projects in this book are great. There are cute items for kids and totally wearable designs for adults. There are instructions for wearable flowers and there are a few holiday decor projects such as Easter bunnies and Christmas stockings.

I went to the local thrift store to see if I could find some wool sweaters for my first felting experience. The book says that items that are 85-100% wool or other animal fiber are best for optimal shrinkage and felting. Acrylic sweaters do not shrink.

I bought two sweaters for $11, which is still more than I wanted to pay, so if you have a wool sweater you're going to get rid of, send it my way!
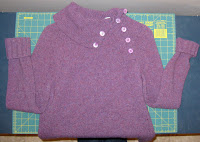
To the right you see the purple sweater in it's original state. The bottom of the sweater is hanging over the edge of the counter.

Here it is, post-felting, I put it on my cutting grid so you could see the difference. Although it seem slight, I love the increased softness and thickness of the item.

For my project, Finglerless Hand-and-Wrist Warmers, I used this sweater (shown here in it's original state). It was a man's XXL 100% wool sweater. and it shrunk down to about a woman's medium.

After felting and drying, this simple project took just 20 minutes from cutting to finished stitching.

As per the instructions, I cut the sleeves 9" from the wrist. I hemmed the cut edge 1/2" with hand stitching. Then I put on the sleeves and pinched the portion of felt between my thumb and forefinger. I removed the sleeve and stitched in that pinched area and I was done!

They are very cosy and I think I'll be using them while I work on the computer as well as during crocheting and embroidering.

Speaking of embroidery, I think these would be even more awesome with some embroidery on the back of them. Put it on my to-craft list! Oh, and you'll have to stay tuned to see what I do with the purple sweater and what else I do with the cream/brown one.

Monday, March 9, 2009

Recycled China

I love china! I love how delicate it looks and all the different designs. I think it's sad that most people don't receive china as a wedding gift any more...well, at least not where I'm from.

I loved this craft idea! Taking flea market china plates and adding words (I love words more than I love crafts) is genius! Here is the link to this project on www.countryliving.com.

This gives me a great reason to pull out some mismatched plates and get 'em up on a wall.

Sunday, November 16, 2008

Update a Craft

Do you have any old crafts that are just a little outdated? I know I do. My mom got my started on tole painting when I was a pre-teen. I loved it and I really got into it. I made most of my stuff for my mom's house, but a few things I kept for myself. They are all really outdated, so I don't even use them. I think it's about time that I paint them and update them a little. Angie, Cami and I had a yard sale a couple of days ago. Angie's mom gave her this turkey to sell. I kept looking at it and wondering if there was anything I could do to fix it. Then I remembered a card I had seen in a scrapbook store. They had cut a circle for the turkeys head and body and the tail was made out of ribbon. I LOVE RIBBON. So, it finally dawned on me that I could do the same thing with this turkey. I pulled all of the rafia off. I sanded and distressed the turkey a little. Then I tied ribbon on the tail in place of the rafia. I used several different colors, patterns and styles. Some of them were just from my stash at home and I bought a few new ones because I don't have a lot of wide ribbons. Here it is... let me know what you think!!! I bet Angie wishes she hadn't gotten rid of this at her yard sale. - Anisa
