Showing posts with label paint. Show all posts

Saturday, October 16, 2010

My first try at Glazing

I love to paint furniture... and I have quite often. I usually spray paint and then sand and distress the furniture.
However, my latest project was a little different. I bought this hutch at a garage sale. I wanted to paint it red and I knew that if I distressed it, the green would show through. So, I came across this tutorial on glazing on All Things Thrifty. I painted with a brush this time because I didn't want the dusty mess of spray paint.
So this green ( I really didn't like the color... it was a little outdated) hutch transformed into this red hutch!
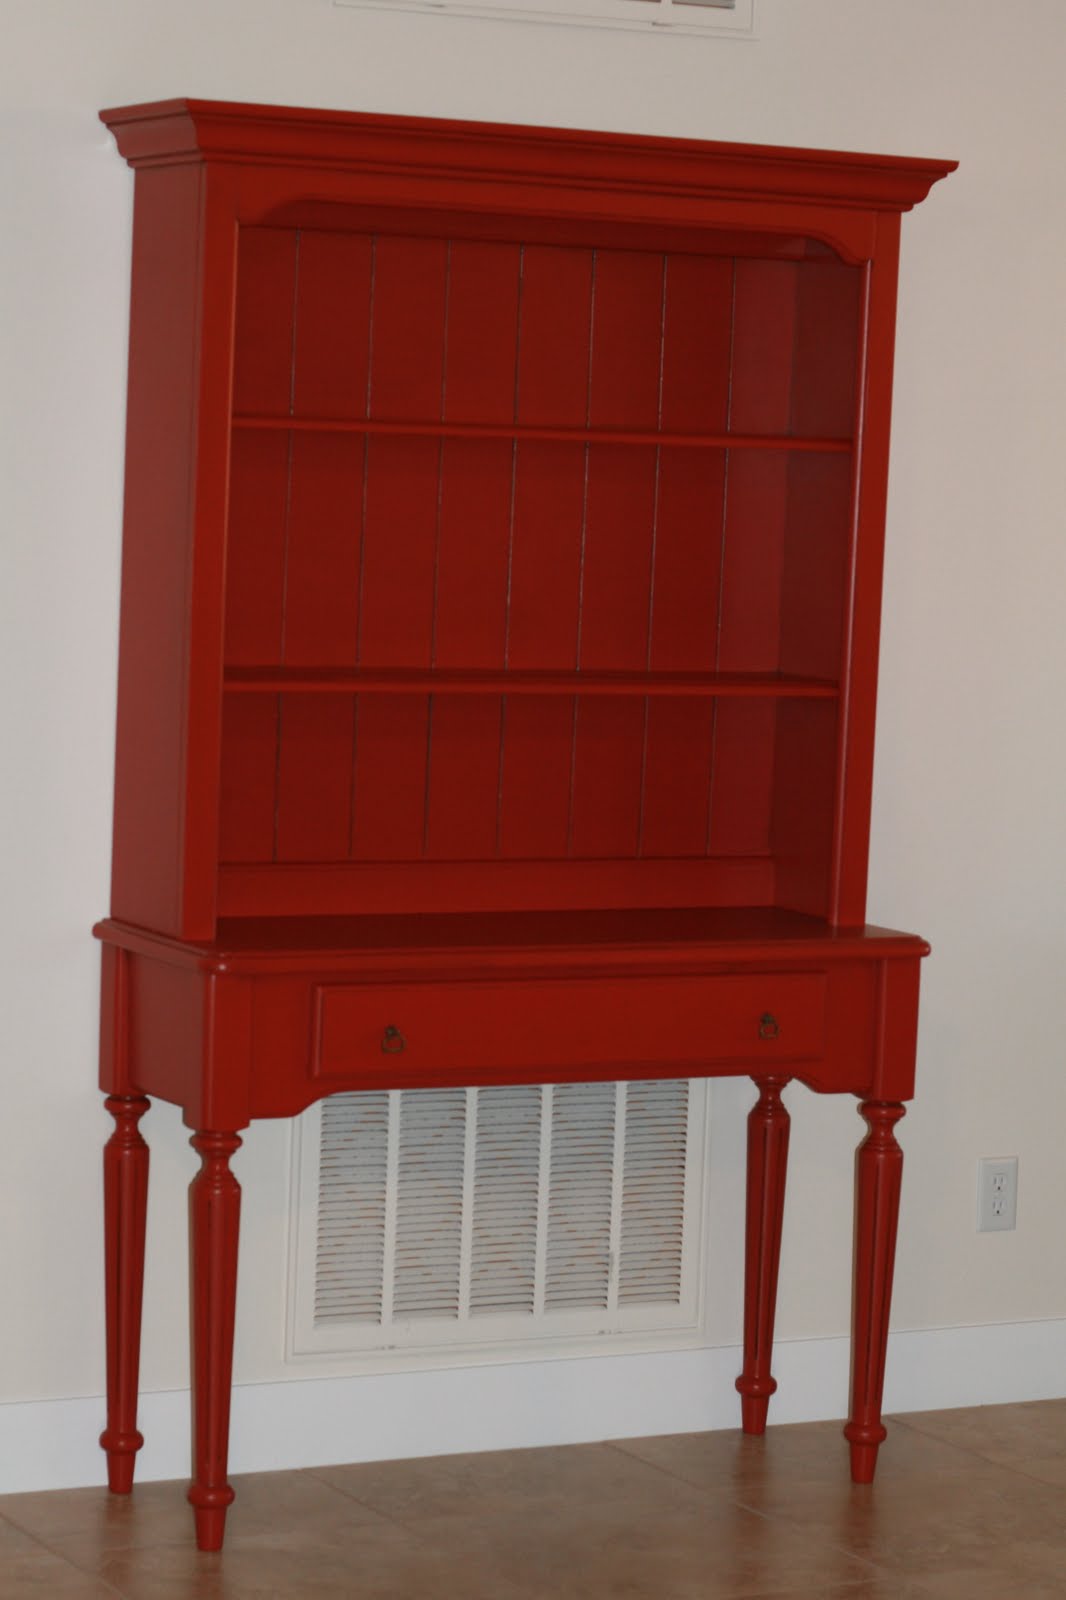
 I love the red.... Here are some close-ups of the glazing. I did a dark brown instead of black.... I was a little nervous my first time around. But I still love the way it looks! -Anisa

Tuesday, June 22, 2010

Bathroom Make-over Part 1


I have long been a huge fan of Becky Higgins and all of the scrapbooking glory that comes with her.  (Especially since she is the one who introduced me to the idea of sketching first!)  She has also shared lots of inspiration for other projects with me and hundreds upon hundreds of other fans, including spray painting ordinary, neutral-colored decor bright friendly colors. 

I have these cute frames that I love.  (Purchased at Tai Pan Trading a few years ago for about $3 each)


They were so pretty against the green wall in my last house, but against the very light tan wall in our current house, they just get lost.  I've been dying to try the spray paint thing.  This seemed like the perfect project for this, but just couldn't justify the $5 per can price for the colors I wanted.  Since, they're just small frames, I hit my local Robert's Arts and Crafts and picked up a few bottles of acrylic paint (on sale!) in the perfect colors. Once home, I gathered a few other supplies and got to work.


After a little sanding, my frames were ready to paint.  My original thought was to do 2-3 coats of paint and then sand.  One coat in, I was smitten with the washed looked it had.  I thought it would be perfect in my Hawaiian-inspired bathroom.  When my one coat was dry, I did do a little sanding.  The blue frame really needed it and just made the frames stand out a bit more overall.  Here's the finished project:


(Sorry for the glare!)

I'm excited for the next one on the bathroom to-do list and will share when it's completed.

~Ang~

Friday, June 18, 2010

My Best Idea for a Long Time

With a little of this...
a wooden dowel and drawer pulls some disassembled flowers
Then I layered them together
on this rather large shelf.The shelf began its life on my little sister's wall. It was painted a midnight blue. Next I painted it a lavender color for my daughter. After that it was painted an almost periwinkle blue for my new baby boy (now three).
I have now repainted it again for my daughter. It used to have those little pegs meant to have connected-wick candles (remember those for home decor?) and other such items, but I did NOT look forward to finding hanging objects for this round of decorating.
My simple solution was to buy a dowel to fill all those tiny holes with. I cut it into small pieces. I found the drawer pulls and when I knew I wanted them to be a different color, the idea of their being the center of a flower turned out to be perfect.
I hammered the dowels in, fitted the flowers over those and capped each off with the drawer pulls. Very inexpensive and my daughter loves it.
-C

Wednesday, June 2, 2010

Staining Tip for Wood Crafts

Seriously, staining has always been such a pain to figure out. I prefer traditional stain, but it has such a strong odor that you have to let it sit in your garage for a few days before you can bring it in the house.
I think I have finally figured out the type of stain that I prefer. And I think I have finally figured out the best techniques. So, here are some tips and tricks.
First, the kind of stain that I buy is Minwax Water-based Wood Stain in Colonial Pine. This stain is somewhat difficult to find, but I have found it at Home Depot. It should be already mixed in that color. The color is important, because anything else will be too dark or too light, etc.
Now, how you stain depends on how distressed or "dirty" you want your craft to look. If you don't want it to look too dirty, then you will want to do a couple of coats of paint and then sand it lightly... that way the stain won't adhere to the wood as well. If you want it to look dirty, then only do one coat of paint and sand away.
This stain is premixed, but I have watered it down a little bit at times to make it go further as well as make it a little lighter.
I always wear gloves when I stain because although it is water-based, it will stick to your hands and is difficult to wash off.
I prefer to stain the sides of the wood first. Then I stain the back. Wipe any excess stain off with paper towels. Then, you will want to stain the front. Wipe the stain on with a foam brush and wipe it off with paper towels. If you don't want the stain to look too dirty, wipe it off quickly.
Always let the stain dry before hot gluing anything to make sure the glue will stick.

Monday, March 15, 2010

My On-Going Project

Ever since we moved into our current home (just over two years ago) I have had a craft room. It's just a non-livable space that the hubby granted to me and I've been really happy about, but it has never been decorated or organized or anything special.
I got tired of that a few months back and have been trying to make it a comfy, cute place where I'm not completely embarrassed to have Angie or Anisa come and craft with me.
It has not been easy.
Little things help, like Anisa recovering a cute chair (here along with a spray paint tutorial) for me and giving me a matching lamp that doesn't fit her decor any longer, but ther real issue is clutter and so much crafty stuff that I don't know what to do with it all! Yikes!
I have before pics that i'm not quite ready to share yet, but here is the first thing I did for my room to add some personality.
I love playing with words so I thought it would be fun to make cross-word puzzle looking wall decor.
I used Making Memory's Simply Fab foam stamps and simple acrylic craft paint. The letters are just under 3" in height, I believe.
I used two pins and a thread with a level to give me a guide to follow and did the long, horizontal phrase first. The rest was just eye-balled.
I love it.
I love it because it didn't cost me anything, but time, as I already had these supplies for scrapbooking.
I love it because it's a piece of me in a room of my very own. How's that Virginia Woolf?
So, I have a lot more that I'm going to be posting about my craft room improvement in the upcoming weeks (months? Yikes!) so keep a look-out for those. Lots of fun!
-C

Tuesday, March 2, 2010

Lucky You!

This shamrock pillow is a cheeky way to let your husband know that he might not want to wear green on St. Patrick's Day this year... To make your own draw a heart. It can be any size, but it should be broad with a shallow middle dip. Here's mine with my hand to show scale.
Take your heart and rotate it as you trace it as each of the leaves (you can do three or four). I used a disappearing fabric pen. Then I cut it out with a rotary cutter.
Here is the whole cut out. You can kind of see the traced lines here. This green felt was left over from a Christmas craft and was purchased in a package I got at Roberts Craft. The wrinkles steamed out easily.
Next I stamped my message (as I am probably the only crafter who has not yet used freezer paper) with white acrylic paint.
Next I added a little decorative flourish with white embroidery floss. I used one of my favorite stitched called the split stitch.
To balance out the flourish, I added a red heart button. You could add a leprechaun-themed charm or gold buttons here instead.
To finish off the pillow, I pinned wrong sides together and used a zig stitch around the edge. Stuff this pillow lightly or it looks all warped and you lose the shamrock shape. I had to work a bit to get the stuffing to look just right. I closed it with the zig stitch when I was done.
From start to finish, this easy project took me just under two hours. If you have any other fun ideas for a good phrase for this pillow, leave it in the comments. -C

Sunday, February 21, 2010

Trinket Bag

In my blog surfing, I noticed that Made and Made by Rae were doing "Celebrate the Boy" for the month of February. Since I have 3 boys of my own, I've been checking out their blog all month. Both of the blogs had different posts about bags for boys. On Made, Dana has a super cute Hobo Sack. Love it, love it... totally cute!!! Then, over on Made by Rae, there was a guest post by Amazing Mae. She had these darling Trinket Keepers.

I have a little boy who I would say is a bit OCD. He decides that he likes a toy and will play with it non stop for days (until he's bored.) He's great about organizing things and lining things up and he loves to put things in groups in baggies. So, to save me some money on Ziploc bags, I thought I would make him is own drawstring bag. I liked the look of the trinket keeps on Amazing Mae, but I liked the idea of a bit bigger of a bag.

Right now his obsession is Trios. But that changes. So I didn't want his bag labeled for his toys because I'd be making a new bag every other day. So, my husband and I call our kids by the initial. I thought it would be cute to have is bag just say "Big J." Then he would use it for whatever his favorite toy is for the week.

So this is what I came up with:) I used my Cricut to cut the letter J out. I appliqued the J on the bag. Then I used my cricut to cut a stencil out of freezer paper. I stenciled acrylic paint over the bag and J and there it is. I then sewed it into a simple drawstring bag with a grosgrain ribbon tie.

He loves it and he takes his treasures everywhere with him now. -anisa

Wednesday, February 17, 2010

Angie's Door and Anisa's Mom's Headboard

A few years ago, my mom got a new front door. She loved her front door tons and didn't want to just get rid of it, so she had my little brother make it into a headboard. It's pretty cute, isn't it? After I met Angie, I found out that she had the same front door. That's kind of crazy, isn't it? So, here is a before picture of the headboard/door. I love doors... especially fun ones like these!!! I would love to find a cool old door to make into a corner bookshelf for my kitchen!!!

Wednesday, February 10, 2010

Crown Molding Shelves

If you live in the Salt Lake City, Utah area, I have a great deal on some awesome crown molding shelves for you!!! My little brother has started a little business making these beautiful shelves.
He sells them by the foot prices... painted or unpainted. Check out his blog for details. This black one is a huge 10 ft. shelf that he made for my mom's bedroom. How fun to have one of these shelves all along a room to display other fun crafting projects.... I think I'm going to have him make me one for my living room.
-Anisa

Wednesday, February 3, 2010

Craft room Storage Crates

I have a cute white desk in my craft room that I purchased on Target.com a few years ago. I love the style and simplicity of it, but the desk has open shelves on it. The open shelves are very deep and I have never been able to find the right size of baskets to fit the shelves. So, considering the fact that I love to cut wood, I decided I was going to make my own wooden crates... that way I could make them to perfectly fit under my desk.
And they fit perfectly.... it's almost scary. I only made three and now looking at the pictures, I'm wondering if I should make one more. I have my Cricut mats and paper trimmers on the top shelf and they kind of hang out so they wouldn't fit in a crate. I guess I could find somewhere else to store them so that I could have a perfectly even desk storage. I had so much fun building them. I love it when I get to use tools and saws without my hubby's help... it's even better that he's willing to clean up my sawdust mess:) My ultimate goal is to get this craft room organized enough that I can take pictures of the whole room and post them for you... one step at a time.... Here's a preview of one wall.

Tuesday, December 8, 2009

Countdown: Baby, it's Cold Outside, but we know you'll go shopping anyway

It is currently 7 degrees Fahrenheit in Utah, but you can warm your friends' and neighbors' hearts each season through thoughtful gifts. In continuing our Countdown with Crafts, here are a few ideas from this week's ads.
  • If you've been crafting in the kitchen and need something to put your goodies in, Michaels had really cute Christmas baskets for 50% off.
  • While I was there I bought acrylic paints for just 69 cents each. My mom has wanted me to paint her a whimsical childhood-related painting for awhile so it's a great thing that they also had artist's back-stapled traditional canvas on sale for 40% off as well!
  • Roberts has all their unfinished wood for 40% off, if you want another place to use acrylic paint.
  • If you make jewelry for others then Jo-Ann has 50% off Jewelry Making bead boards and a buy one, get one 50% off deal on Blue Moon beads (though Roberts has Blue Moon for 30% off)
  • Neighbor gift idea: both Roberts and Michaels has their ornaments 50% off.

    Buy a pack of the large clear glass ones. Funnel in around 1/4 cup of pretty sand and toss in a few tiny seashells. Tie a ribbon and this message at the top. I received this as a gift last year and really love it.

    Now, what did I do with all the great deals this week? I bought Team Licensed Fleece at Jo-Ann for 25% off and made the simple no-sew fleece blanket for my BYU-loving husband. (here's a little tutorial from Project Linus With the little extra that was part of the piece I was buying I also made him a team pillow. He's going to love these and it was pretty simple to do. There's a man-gift for you.

Friday, November 13, 2009

Santa's Cookie Tray

Santa Cookie Tray

The other day I found an old frame I had purchased at a thrift store with the intention of making it into some sort of serving tray. With Christmas fast approaching, I thought the perfect idea would be a fun tray to leave Santa's cookies and milk on. (I apologize for the glare on some of these. Rotten time of day to get a good picture.) Supplies needed: 1 thrifted frame (with the glass still in) big enough to hold a small plate of cookies and glass of milk Paint-acrylic or spray Scrap paper in Christmas colors/themes Letter stickers, die cuts, or computer to make title Adhesive Trim, stamps, embellishments as desired First rough up your frame for easier painting. I lucked out that the gold trim on this one was just painted gold. :) Next paint your desired color. I used Ebony from Americana paints (which you can find at Hobby Lobby, Roberts Arts and Crafts, etc.) While that's drying, take the cardboard backing and start piecing together your paper. It was easier for me to think of this part as making one giant Christmas card. When you're doing this, remember to leave yourself a slight margin all the way around to prevent your work from being covered up by the frame. I used only supplies I had on hand and got to revisit a favorite technique-embossing. I didn't have any sparkly ribbon so I found a snowflake stamp in my collection. First stamp the image with Versa Mark ink (a clear pigment ink) then sprinkle with silver embossing powder. Gently tap the board over a scrap paper to remove excess powder and melt the powder with a heat gun. Repeat the process for the stars on top of the Christmas trees. When you're satisfied with the way it looks, pop it into your dried frame. When I was finished, I discovered a pleasant surprise. Not only will this make a darling tray to hold Santa's goodies, but will be a fun decoration to use the other 24 days of December! (I bet you could come up with something fun for a cute Thanksgiving tray, too!)

Friday, October 30, 2009

The Start of Something Big: Countdown with Crafts

With the holidays just 'round the corner and tight budgets everywhere, we thought we'd do something that will help you fill your Christmas gift list with fun crafting ideas.

Each week on Tuesday, we will feature a craft with products featured in the ads of various chain craft stores. We realized that using the ads isn't going to be helpful for everyone, but the inspiring craft ideas will! As a kick-off, I offer the following:
Wooden-framed magnet boards often go on sale (or you can always use your large percent discount coupon). I used an inexpensive red spray paint (after removing the steel insert).
I am using this in my craft/inspiration room as a home for all my Magnetic Poetry. I love the stuff, but haven't had a place for it, especially since I've been raising little ones.
I wanted to use rub-ons in poetic flourishes as an embellishment. Not only were there no rub-ons on sale, I couldn't find any I liked well enough anyway.
However, the acrylic stamps were on sale at Michael's and they had a great selection of said flourishes.
I was a little doubtful as to how they'd turn out because the only black ink I had was StazOn, but as you can see it turned out well! The clear stamps are Inque Boutique brand. The nice thing about stamps like these is not only can you see when you stamp with them, but you can place them where you think you might want them before you stamp.
Here's a stamping detail.And the finished piece (sorry about the bad lighting) and I'm really pleased with it.
Remember to check us out on Tuesdays for our Countdown with Crafts posts, all the way till Christmas after we get a chance to check the ads. Look for our other posts as well.
--C

Tuesday, October 27, 2009

Product Challenge: Buckets

Our product challenge this month was buckets! (I can't lie to you, I was super excited because I already had a project done with buckets that I hadn't posted yet). So all I had to do was take a picture. Do you love the dollar section at Target as much as I do? Well, they often have buckets. So, awhile back I bought several buckets at Target to keep my ribbon in. I made a template out of paper for the bucket, then used my scraps of scrapbook paper and covered the buckets with every color of the rainbow... and then some! I then tied little scraps of ribbon on the handle of each bucket. This helped organize my obsession with ribbon (well, at least the smaller pieces. I have the full rolls of ribbon just in a cupboard... I really like ribbon). Hey, let me know if you want to see pics of my whole craft room sometime and I'll try to clean it up to make a post!!! Just leave me a comment.

So, the ribbon ones are totally cute, but you can't forget my favorite bucket of all..... my thread bucket. I love this thing. I keep it next to my sewing machine so when I clip off the thread I have a quick place to throw it!!! -Anisa:)

My bucket project ended up not being a craft but an organizational project. I had been reading Pretty Organized Palace's blog and one post in particular caught my attention. She was sharing some fun ways to cozy up the home for fall and winter. With my inspiration starting there, I headed to my local Hobby Lobby and purchased this large bucket/basket. At home I filled it with all my yummy yarn for crocheting (and one day hopefully knitting) and placed it by the fireplace. I love how it makes my family room just that much more comfy cozy with the bonus I have yarn storage in plain sight.

-Ang

Check out these darling buckets that one of our readers... Shellie... sent into us. Super cute storage. Here's what she says about them,

"Here is what I have been doing with buckets. I only have 3 done. I still want a ribbon one and thread etc… I just bought some for a couple of dollars and spray painted them, cut out vinyl on my Cricut for the letter."

Way to go Shellie!

Saturday, October 24, 2009

A little bit of decor in my master bath

So I have this fun little alcove in my master bath where the bathtub is. Kinda boring, right? I started with this window that I had purchased for $1 at a yard sale. It was white and I spray painted it black. Kind of a little boring by itself.
I was over visiting Trey and Lucy awhile back and saw this cute idea. And what do you know.... a few weeks later, I found this wreath at a yard sale for $2! I totally knew what to do with that!
On the wall above the towel rack, I was thinking of doing some vinyl of some sort. But you know how much I love wood and all of my wood crafts.... So what I did instead, was I used my Cricut and the Storybook cartridge (which I borrowed from a friend in July and really need to return). I cut the little bird swirly thing out as big as I could do it.... 12x24. Used that as a pattern and cut it out of wood. It's fun to have a nice black silhouette but actually have some dimension to it. By the way, I will be selling these at the Seedlings boutique coming up in a couple of weeks!!! Or, you could buy one from me directly if you're interested, just send me an email at anisascholes@gmail.com
And here's the semi-final product. I'm thinking it needs a little color, so I'll probably get some ribbon to add to the wreath and what-not. Leave a comment and let me know what you think! -Anisa