


 - Anisa
Friday, December 5, 2008
Spiritual Gifts
Last year we started the tradition of giving a gift to baby Jesus for Christmas (it is His birthday after all.) So I made this cute tin that we put under the back of our tree. After everyone has opened their gifts and things settle down, we take it out and write down the things that we would like to give to baby Jesus. These are spiritual gifts and it helps us to remember the true meaning of Christmas. - Anisa
- Anisa
Wednesday, December 3, 2008
Christmas Ornaments
Each member of my family gets to choose a new ornament every year for the Christmas Tree. This year we thought it would be fun (and thrifty) to make our own.
 I took clear glass ball ornaments purchased from a local craft store. They are 2 5/8" in diameter. I purchased them last year, but I remember them being very inexpensive (especially with the discount coupon).
I had each family member list things that represented them this last year. I used our computer (thank you, Google) to find images to match those lists, printed them off and cut them out. Example: my oldest son had images of a soccer ball (he was on a team), his school mascot (his first year in his new school), piano keys (he began lessons in July), his age and the word Narnia (we finished all the books together).
I used "Christmas Shred" to fill in the center and force those tiny pieces of paper against the glass.
It took some patience and a few long, skinny tools, but I finished them.
I took clear glass ball ornaments purchased from a local craft store. They are 2 5/8" in diameter. I purchased them last year, but I remember them being very inexpensive (especially with the discount coupon).
I had each family member list things that represented them this last year. I used our computer (thank you, Google) to find images to match those lists, printed them off and cut them out. Example: my oldest son had images of a soccer ball (he was on a team), his school mascot (his first year in his new school), piano keys (he began lessons in July), his age and the word Narnia (we finished all the books together).
I used "Christmas Shred" to fill in the center and force those tiny pieces of paper against the glass.
It took some patience and a few long, skinny tools, but I finished them.
 --C
--C
I took clear glass ball ornaments purchased from a local craft store. They are 2 5/8" in diameter. I purchased them last year, but I remember them being very inexpensive (especially with the discount coupon).
I had each family member list things that represented them this last year. I used our computer (thank you, Google) to find images to match those lists, printed them off and cut them out. Example: my oldest son had images of a soccer ball (he was on a team), his school mascot (his first year in his new school), piano keys (he began lessons in July), his age and the word Narnia (we finished all the books together).
I used "Christmas Shred" to fill in the center and force those tiny pieces of paper against the glass.
It took some patience and a few long, skinny tools, but I finished them.
--C
Tuesday, December 2, 2008
Early Gift Craft
Angie turned me on to this simple necklace design that would  make a great Christmas gift for any female on your list. If you are even mildly interested in trying to make jewelry, this is a great beginner project. Necklace can be worn as one large strand or doubled up.
Here's the simple formula: 2.5 inches of seed beads, medium-sized complimentary bead, the large bead, then the medium-sized bead and repeat.
make a great Christmas gift for any female on your list. If you are even mildly interested in trying to make jewelry, this is a great beginner project. Necklace can be worn as one large strand or doubled up.
Here's the simple formula: 2.5 inches of seed beads, medium-sized complimentary bead, the large bead, then the medium-sized bead and repeat.
 Supplies I used:
 make a great Christmas gift for any female on your list. If you are even mildly interested in trying to make jewelry, this is a great beginner project. Necklace can be worn as one large strand or doubled up.
Here's the simple formula: 2.5 inches of seed beads, medium-sized complimentary bead, the large bead, then the medium-sized bead and repeat.
make a great Christmas gift for any female on your list. If you are even mildly interested in trying to make jewelry, this is a great beginner project. Necklace can be worn as one large strand or doubled up.
Here's the simple formula: 2.5 inches of seed beads, medium-sized complimentary bead, the large bead, then the medium-sized bead and repeat.
 Supplies I used:
- .30mm silver colored beading wire
- 2 7" strands Blue Moon Natural Elegance ceramic beads. (These beads are just barely larger than a dime and it came with the complimentary medium-bead though I did have to add four more from my stash.)
- 2 crimping beads
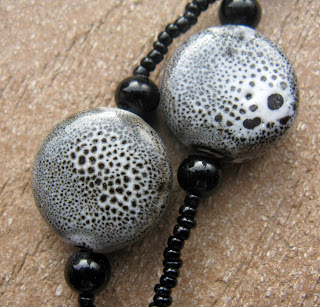

I repeated the pattern 12 times which left me two large beads with which to make matching earrings.
To finish off, I tied a square knot and put crimping beads on either side. I threaded the extra wire back through the beads for an inch or so.
--CSunday, November 23, 2008
Weekly Discovery- Silhouettes
On Mondays we are going to start a new feature called "Weekly Discovery." We will highlight a product or idea the we find on the web, in a book, magazine, etc. Our first feature is on Silhouettes.
 The summer after I graduated from high school I had the opportunity to go on a vacation with some friends to France. When we were in Paris, I had a street artist draw a silhouette of me. (by the way, my nose isn't really that big)
I stuck it in my scrapbook and had kind of forgotten about it. A couple of months ago, I was reading a magazine called "100 decorating ideas under $100." It had a feature on silhouettes. I thought they looked pretty cool and was thinking of making some of my family and putting them in my living room. The article featured a website called cutarts.com. He has some great silhouettes on there and you can purchase custom made art from him. Then, a few weeks later, I came across this website called Restyled Home. I loved her profile silhouettes and she gives a great tutorial to tell  you how to do them. A few weeks after that, I saw these pillows in a magazine called Creative Home by BH&G. It was the winter 2007 issue. And to top it all off, my son loves the show Tom & Jerry. I was watching it with him one night and I noticed that Jerry had silhouettes hanging on his wall in his little mouse hole. I took all of those things as a sign that I was supposed to make these for my family.
 you how to do them. A few weeks after that, I saw these pillows in a magazine called Creative Home by BH&G. It was the winter 2007 issue. And to top it all off, my son loves the show Tom & Jerry. I was watching it with him one night and I noticed that Jerry had silhouettes hanging on his wall in his little mouse hole. I took all of those things as a sign that I was supposed to make these for my family.
So, I plan on making a profile of each of my 5 family members. I am going to follow the tutorial from Restyled Home and make my profiles black with a white background. I will put them in black picture frames and hang them on the wall in my black and white living room. Check back soon to see my finished product.
-Anisa
Friday, November 21, 2008
Gratitude Box
One of our favorite parts about crafts is diversity. We each have our own styles. One of the features we want to provide to you on our site is "One Craft- Three Ways." Once a month we will choose a craft that we all like and want to do. Then we will go our separate ways and create. We will publish the final results here for you to see how a blank canvas can turn out three different ways.  This month we chose Gratitude Boxes. This a great way for our families to share what we are grateful for. We can add our thoughts to these boxes year after year.
We started with a blank box. In this case, a papier mache from Provo Craft, purchased from the local craft store. (box measures 5 1/2" X 5 1/2" not including scallops)
Here is Anisa's final result. I decided that I would like to put a chipboard album inside mine to record my families thoughts on what they are thankful for.
This month we chose Gratitude Boxes. This a great way for our families to share what we are grateful for. We can add our thoughts to these boxes year after year.
We started with a blank box. In this case, a papier mache from Provo Craft, purchased from the local craft store. (box measures 5 1/2" X 5 1/2" not including scallops)
Here is Anisa's final result. I decided that I would like to put a chipboard album inside mine to record my families thoughts on what they are thankful for. Here is a glimpse of what the inside of the album looks like. Each person has a page with a tab on the side with their name on it. Each page has a little paper bag pocket with a card inside. On each card, we will write the year and what we are grateful for.

 Cami went with a simple approach, using semi-traditional Thanksgiving colors.

 She used 7 Gypsies Graditude sticker sheet to embellish the box as well as the cardstock squares inside.
 Although Thankgiving is past, you can use this concept for anything. Last year, Anisa used an embellished craft lunch pail to make a box to hold the gifts that her family would give to the Savior for Christmas, such as service to others, etc. May be she'll share it before the month is out.
 This month we chose Gratitude Boxes. This a great way for our families to share what we are grateful for. We can add our thoughts to these boxes year after year.
We started with a blank box. In this case, a papier mache from Provo Craft, purchased from the local craft store. (box measures 5 1/2" X 5 1/2" not including scallops)
Here is Anisa's final result. I decided that I would like to put a chipboard album inside mine to record my families thoughts on what they are thankful for. Here is a glimpse of what the inside of the album looks like. Each person has a page with a tab on the side with their name on it. Each page has a little paper bag pocket with a card inside. On each card, we will write the year and what we are grateful for.
This month we chose Gratitude Boxes. This a great way for our families to share what we are grateful for. We can add our thoughts to these boxes year after year.
We started with a blank box. In this case, a papier mache from Provo Craft, purchased from the local craft store. (box measures 5 1/2" X 5 1/2" not including scallops)
Here is Anisa's final result. I decided that I would like to put a chipboard album inside mine to record my families thoughts on what they are thankful for. Here is a glimpse of what the inside of the album looks like. Each person has a page with a tab on the side with their name on it. Each page has a little paper bag pocket with a card inside. On each card, we will write the year and what we are grateful for.

I wanted a box that my family could contribute to on a monthly basis, so I tried to stay with everyday colors (versus fall colors). The plan is once a month we'll gather as a family and write down things we are thankful for. Come next thanksgiving we will have a great record of our last year's blessings and something fun to read over dinner. As my kids are all small, it will also be fun to see how their handwriting changes and improves.
Angie also wanted to use hers throughout the year and so chose colors that fit her home decor rather than traditional fall colors.
Cami went with a simple approach, using semi-traditional Thanksgiving colors.
She used 7 Gypsies Graditude sticker sheet to embellish the box as well as the cardstock squares inside.
Although Thankgiving is past, you can use this concept for anything. Last year, Anisa used an embellished craft lunch pail to make a box to hold the gifts that her family would give to the Savior for Christmas, such as service to others, etc. May be she'll share it before the month is out.
Sunday, November 16, 2008
Update a Craft
Do you have any old crafts that are just a little outdated? I know I do. My mom got my started on tole painting when I was a pre-teen. I loved it and I really got into it. I made most of my stuff for my mom's house, but a few things I kept for myself. They are all really outdated, so I don't even use them. I think it's about time that I paint them and update them a little.
Angie, Cami and I had a yard sale a couple of days ago. Angie's mom gave her this turkey to sell.
 I kept looking at it and wondering if there was anything I could do to fix it. Then I remembered a card I had seen in a scrapbook store. They had cut a circle for the turkeys head and body and the tail was made out of ribbon. I LOVE RIBBON. So, it finally dawned on me that I could do the same thing with this turkey. I pulled all of the rafia off. I sanded and distressed the turkey a little. Then I tied ribbon on the tail in place of the rafia. I used several different colors, patterns and styles. Some of them were just from my stash at home and I bought a few new ones because I don't have a lot of wide ribbons. Here it is... let me know what you think!!! I bet Angie wishes she hadn't gotten rid of this at her yard sale.
 - Anisa
 I kept looking at it and wondering if there was anything I could do to fix it. Then I remembered a card I had seen in a scrapbook store. They had cut a circle for the turkeys head and body and the tail was made out of ribbon. I LOVE RIBBON. So, it finally dawned on me that I could do the same thing with this turkey. I pulled all of the rafia off. I sanded and distressed the turkey a little. Then I tied ribbon on the tail in place of the rafia. I used several different colors, patterns and styles. Some of them were just from my stash at home and I bought a few new ones because I don't have a lot of wide ribbons. Here it is... let me know what you think!!! I bet Angie wishes she hadn't gotten rid of this at her yard sale.
 - Anisa
Tuesday, November 11, 2008
Arrange-a-frame
12 screws. 6 frames. A big wall. One woman.
Thanks to some random home decorating show on TLC (not one I was familiar with) and Pottery Barn's catalog (my home decor study guide), I have a very nice arrangement of our recent family pictures. The pictures are cute and the frames are satisfactory, but how do you hang SIX pictures to form a nice arrangement and keep everything aligned properly?? Let me show you....
First, trace the frames on some paper and cut out --do this for each frame you'll hang. (While you are tracing you can also make marks so you know where to pound in your hardware.)
Using painters tape, hang them on your chosen wall and now you have a template!
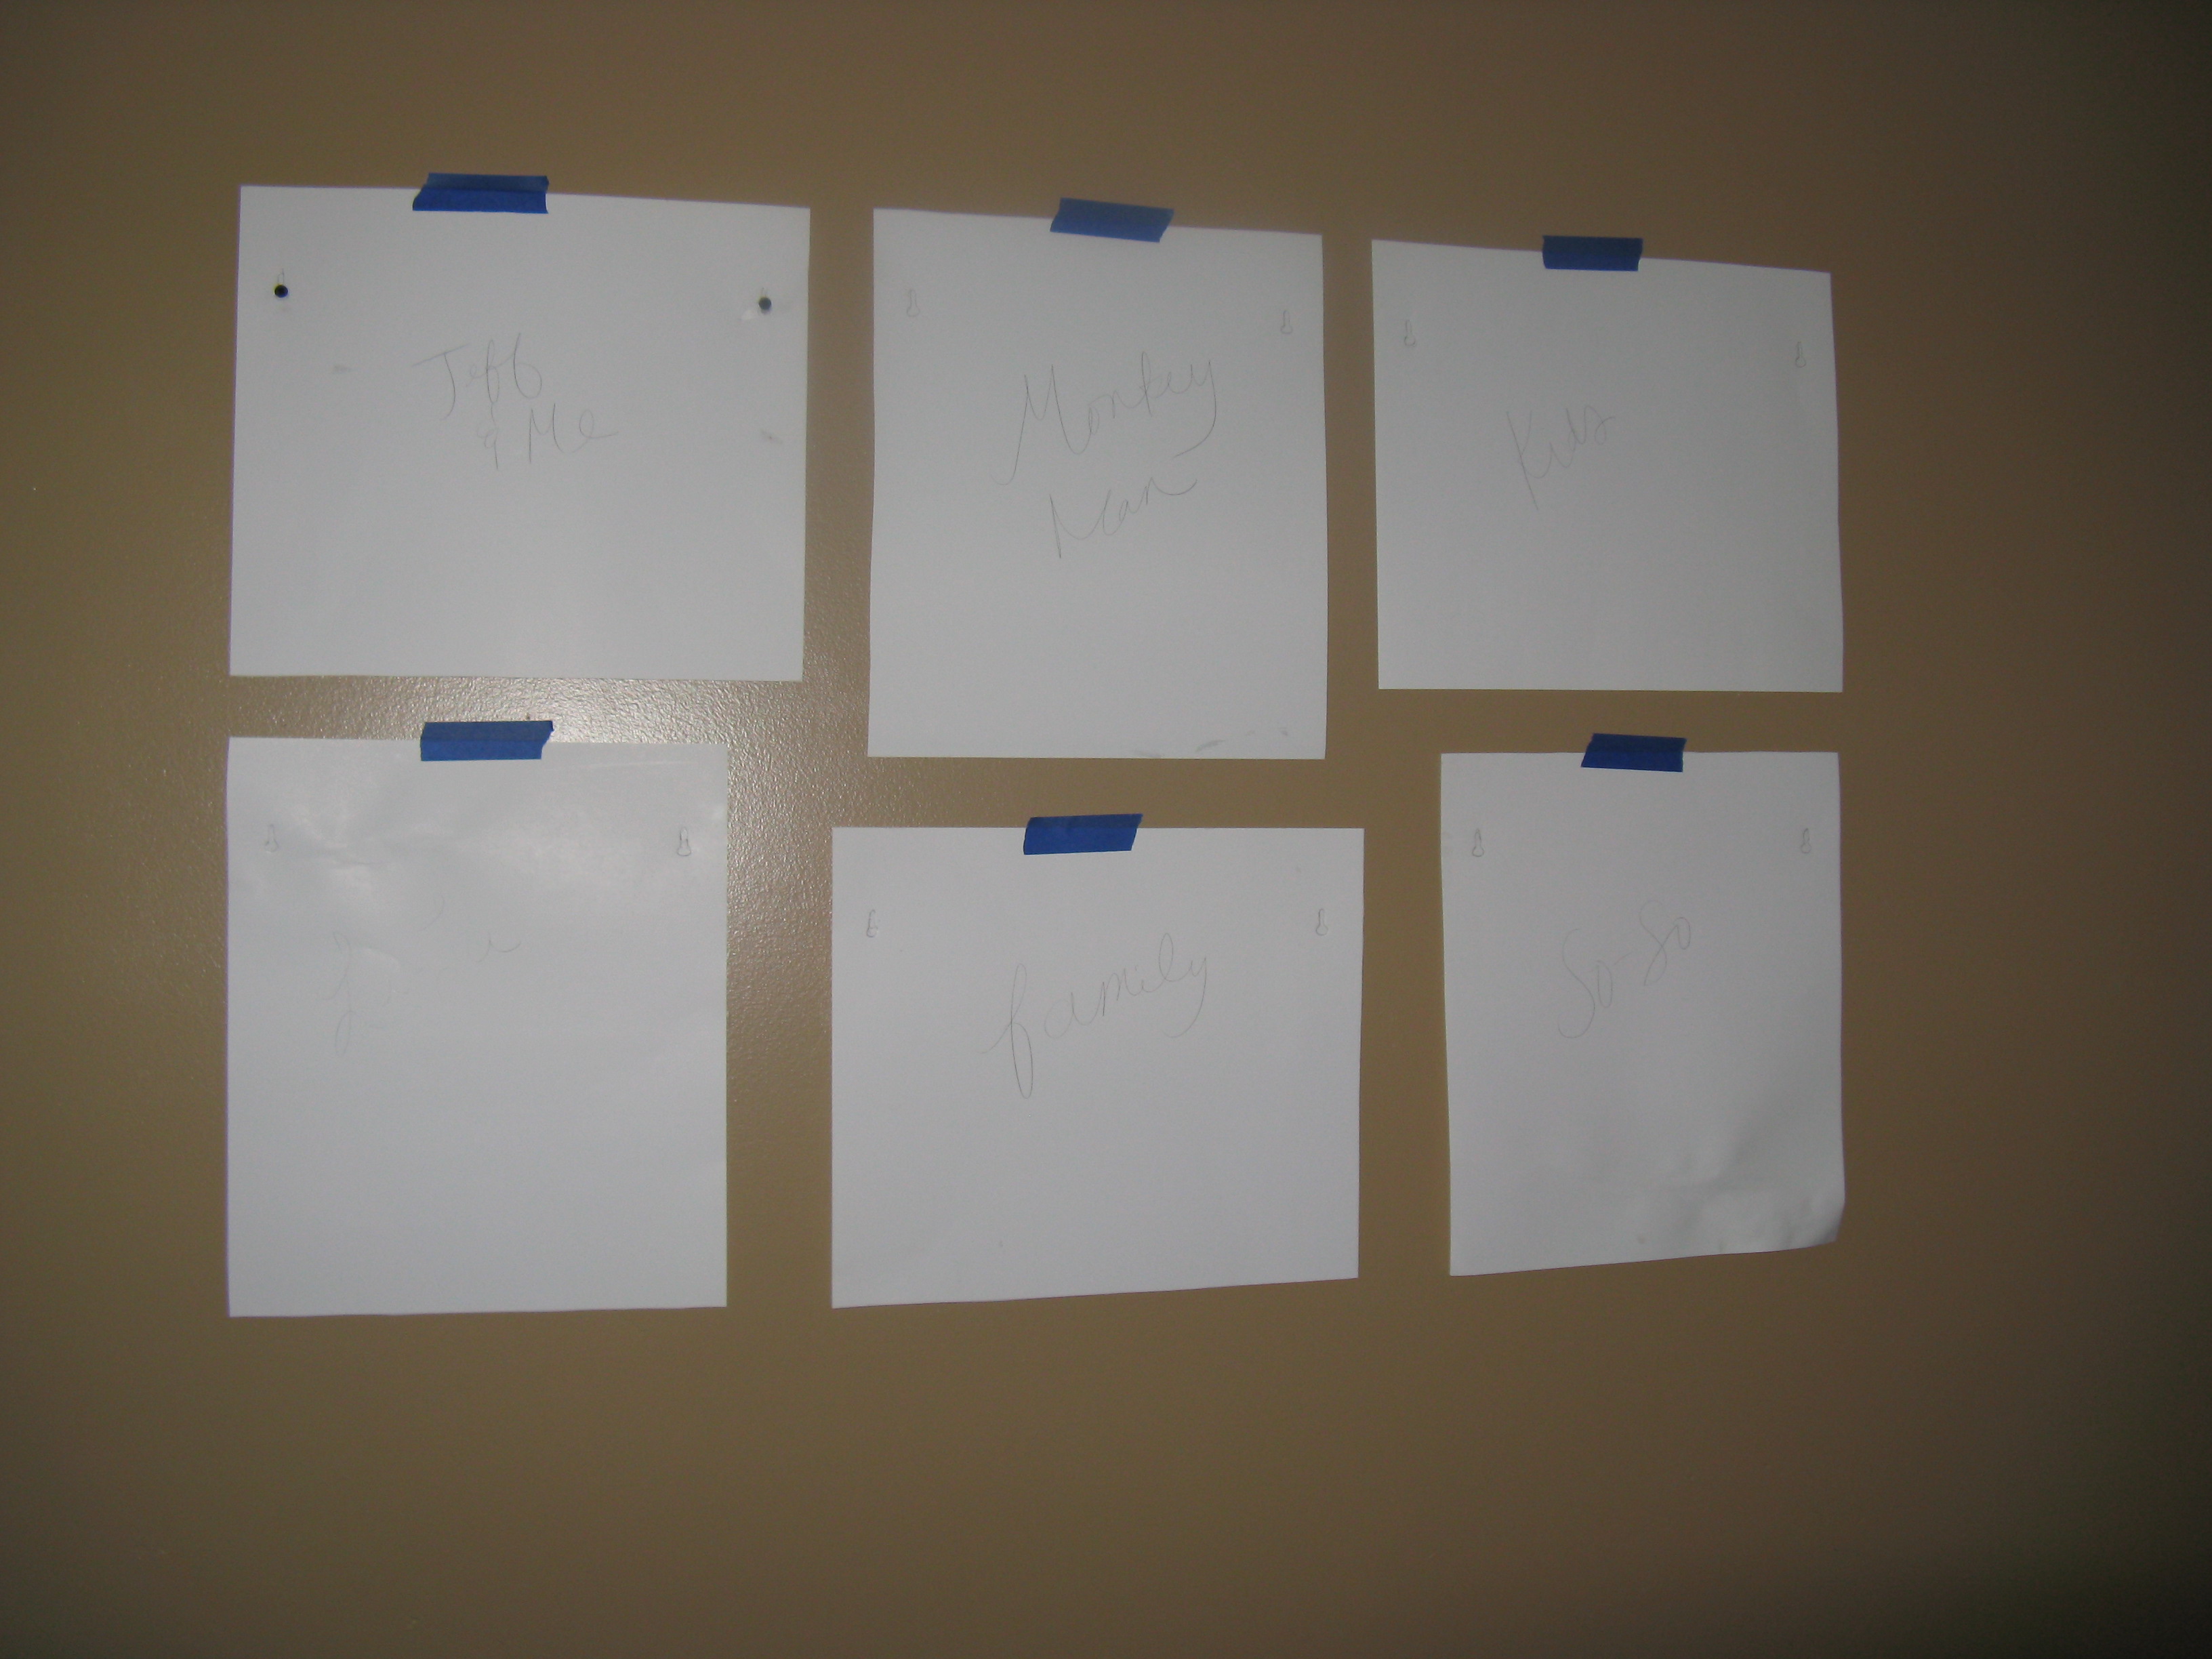 Once your arrangement looks the way you want, drill your screws or pound your nails right on top of the paper like so:
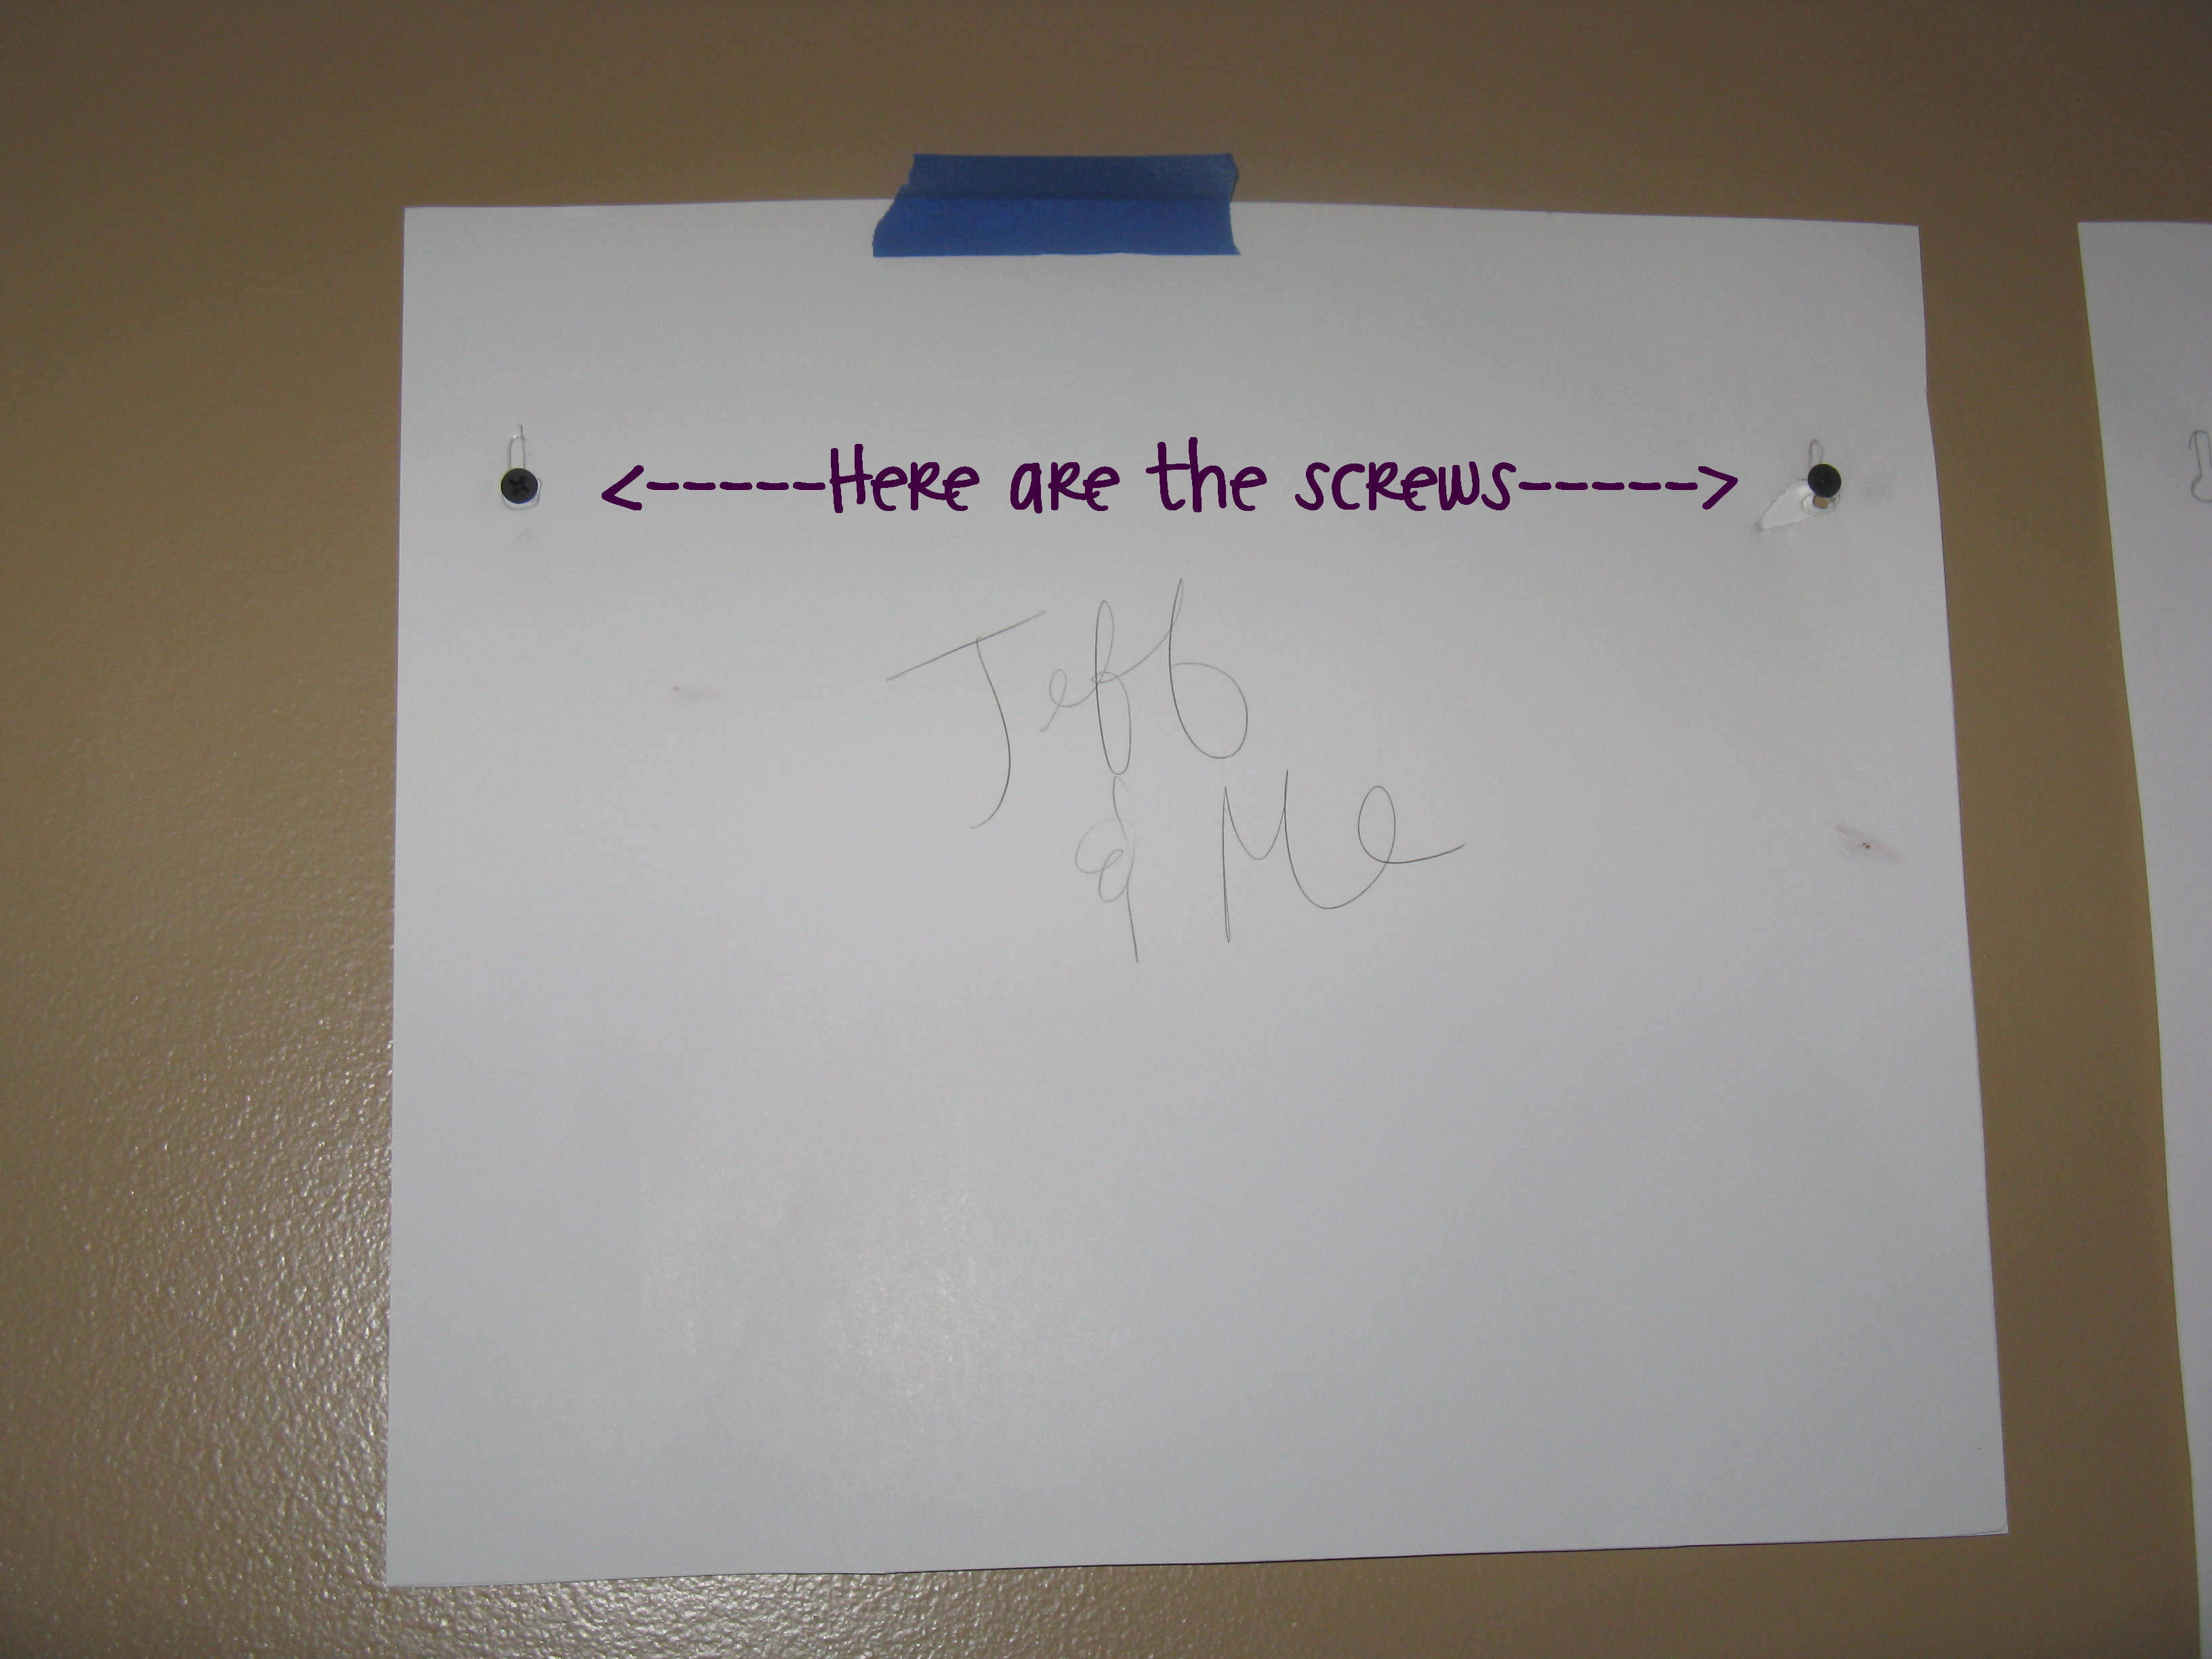 Next, rip the paper off and hang your pictures. Here is my final product:
 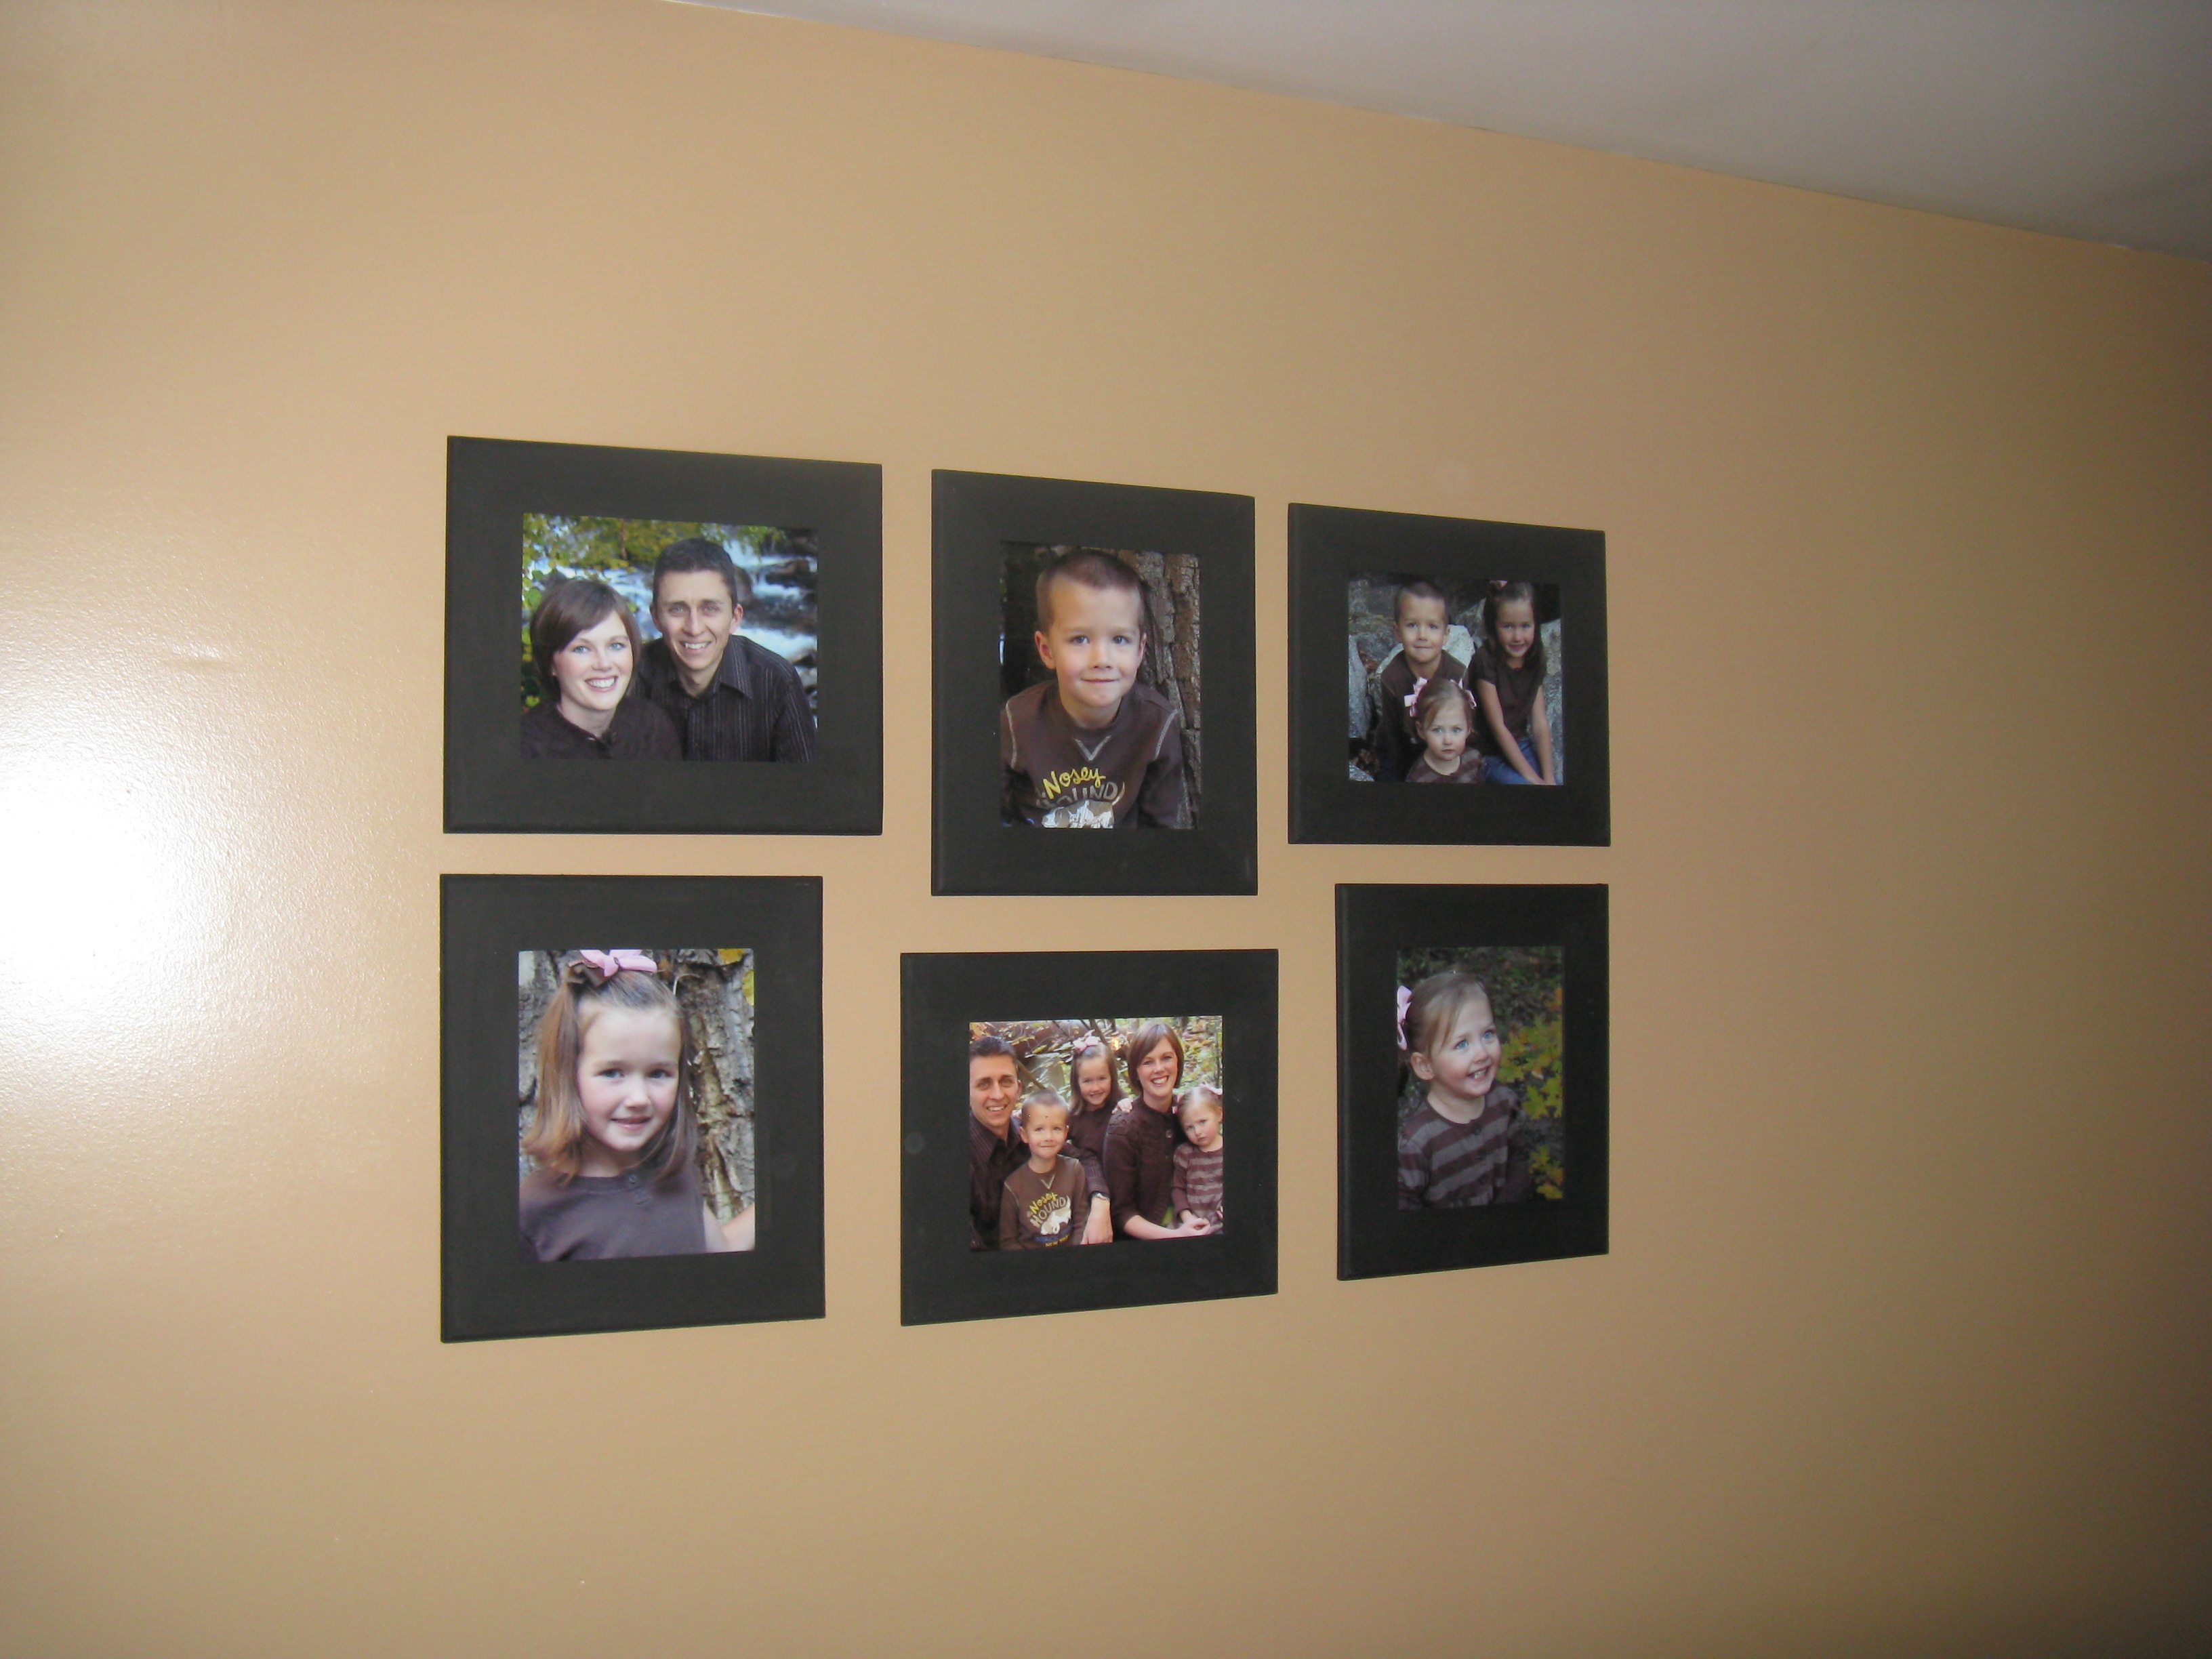 Now if I could just figure what to put on either side on my new grouping.....
 Once your arrangement looks the way you want, drill your screws or pound your nails right on top of the paper like so:
 Next, rip the paper off and hang your pictures. Here is my final product:
  Now if I could just figure what to put on either side on my new grouping.....
Throw Pillow Slip Covers
I never buy throw pillows (okay, hardly ever). I feel like I can make them quickly and inexpensively. I'm not a major sewer, but if you can sew straight lines, you can sew this!
.JPG) The first thing that you want to do is measure your pillow.
My pillow was 19" square. Then, I cut the fabric for the front of my pillow. You will want to cut your fabric 1" bigger to allow for 1/2" seam allowances.
The back of yo
The first thing that you want to do is measure your pillow.
My pillow was 19" square. Then, I cut the fabric for the front of my pillow. You will want to cut your fabric 1" bigger to allow for 1/2" seam allowances.
The back of yo.JPG) ur pillow is going to have 2 pieces of fabric that overlap. This way, you can take the fabric off and wash it easily. To cut the back pieces, you will want them to be half the size of the pillow plus 2-3". So, I cut my pieces 13". Then, you will need to turn over one edge of each of the pieces. These are the edges that are going to show when you have your finished pillow.
The next step is to pin your pieces of your pillow together. You will want to lay the front of the pillow on a table, front side up. Then you will want to lay your two back pieces on top of that front sides down. You will want to have your turned over edges on the inside of the pillow, overlapping.
ur pillow is going to have 2 pieces of fabric that overlap. This way, you can take the fabric off and wash it easily. To cut the back pieces, you will want them to be half the size of the pillow plus 2-3". So, I cut my pieces 13". Then, you will need to turn over one edge of each of the pieces. These are the edges that are going to show when you have your finished pillow.
The next step is to pin your pieces of your pillow together. You will want to lay the front of the pillow on a table, front side up. Then you will want to lay your two back pieces on top of that front sides down. You will want to have your turned over edges on the inside of the pillow, overlapping. .JPG) Pin all around the outside, then take it to your sewing machine and sew all around the outside edge. Flip your pillow right side out and stuff your old pillow inside!!!
This project takes less than 1 hr. (it probably took me longer to post this on the blog.) It also is quite in expensive if you already have a pillow that you are just recovering. All it costs is the fabric. For this one, I used just a little over 1/2 a yard.
Good luck and email me if you have any questions.
-Anisa
Pin all around the outside, then take it to your sewing machine and sew all around the outside edge. Flip your pillow right side out and stuff your old pillow inside!!!
This project takes less than 1 hr. (it probably took me longer to post this on the blog.) It also is quite in expensive if you already have a pillow that you are just recovering. All it costs is the fabric. For this one, I used just a little over 1/2 a yard.
Good luck and email me if you have any questions.
-Anisa
The first thing that you want to do is measure your pillow.
My pillow was 19" square. Then, I cut the fabric for the front of my pillow. You will want to cut your fabric 1" bigger to allow for 1/2" seam allowances.
The back of yo.JPG) ur pillow is going to have 2 pieces of fabric that overlap. This way, you can take the fabric off and wash it easily. To cut the back pieces, you will want them to be half the size of the pillow plus 2-3". So, I cut my pieces 13". Then, you will need to turn over one edge of each of the pieces. These are the edges that are going to show when you have your finished pillow.
The next step is to pin your pieces of your pillow together. You will want to lay the front of the pillow on a table, front side up. Then you will want to lay your two back pieces on top of that front sides down. You will want to have your turned over edges on the inside of the pillow, overlapping.
ur pillow is going to have 2 pieces of fabric that overlap. This way, you can take the fabric off and wash it easily. To cut the back pieces, you will want them to be half the size of the pillow plus 2-3". So, I cut my pieces 13". Then, you will need to turn over one edge of each of the pieces. These are the edges that are going to show when you have your finished pillow.
The next step is to pin your pieces of your pillow together. You will want to lay the front of the pillow on a table, front side up. Then you will want to lay your two back pieces on top of that front sides down. You will want to have your turned over edges on the inside of the pillow, overlapping. .JPG) Pin all around the outside, then take it to your sewing machine and sew all around the outside edge. Flip your pillow right side out and stuff your old pillow inside!!!
This project takes less than 1 hr. (it probably took me longer to post this on the blog.) It also is quite in expensive if you already have a pillow that you are just recovering. All it costs is the fabric. For this one, I used just a little over 1/2 a yard.
Good luck and email me if you have any questions.
-Anisa
Pin all around the outside, then take it to your sewing machine and sew all around the outside edge. Flip your pillow right side out and stuff your old pillow inside!!!
This project takes less than 1 hr. (it probably took me longer to post this on the blog.) It also is quite in expensive if you already have a pillow that you are just recovering. All it costs is the fabric. For this one, I used just a little over 1/2 a yard.
Good luck and email me if you have any questions.
-Anisa
Subscribe to:
Posts (Atom)





 Posts
Posts


