


Start with a small wooden tile or large metal washer...anything flat that could be covered with paper. For this tutorial, I'm just going focus on the wooden tile (purchased at a local craft store). You'll also need it's dimentions later, so measure it. I then painted the tile black. You can leave it the way it is, but painting it a unifying color looks good. Next look on the internet or at your own photos or create something that can be printed. I wanted to make something special for my friend, Ane, so I looked at pictures from New Moon for Jacob Black.
 Photoshop comes in handy here, but if you don't have it...later.
When you open up the photo you want to use, click on the Crop tool. You can set the shape of the crop it will do to the dimentions of your tile (that you measured, remember?) The orange arrow is pointing at this feature.
Photoshop comes in handy here, but if you don't have it...later.
When you open up the photo you want to use, click on the Crop tool. You can set the shape of the crop it will do to the dimentions of your tile (that you measured, remember?) The orange arrow is pointing at this feature.

Next look on the internet or at your own photos or create something that can be printed. I wanted to make something special for my friend, Ane, so I looked at pictures from New Moon for Jacob Black.Photoshop comes in handy here, but if you don't have it...later.
When you open up the photo you want to use, click on the Crop tool. You can set the shape of the crop it will do to the dimentions of your tile (that you measured, remember?) The orange arrow is pointing at this feature.
If you don't have Photoshop, just drag the photo into a Microsoft Word document and play with the size in there till you think it'll be just bigger than your tile.
 At this point, you can attach a bail or some other type of loopy finding on to the back of the tile so that you'll be able to wear it. You'll need a serious glue for this. E6000 was used here.
 You can touch up the paint on the sides now or later, if you want. Or you can have a more distressed look.
Print out your picture on regular printer paper and cut it out.
When the paint on your tile is dry, paste the photo onto it.
I used a SMALL bit Ranger Ink's Glossy Accents Clear Dimensional Embellishment, pressed the photo firmly to the tile and wiped away any leaking adhesive coming out of the sides. I put it face down with a weight to keep it flat and left it for several minutes.
At this point, you can attach a bail or some other type of loopy finding on to the back of the tile so that you'll be able to wear it. You'll need a serious glue for this. E6000 was used here.When the glue is dry, sand the excess paper away.
You can touch up the paint on the sides now or later, if you want. Or you can have a more distressed look. Personally, I just look in the mirror for a distressed look.
 It is applies very thickly.
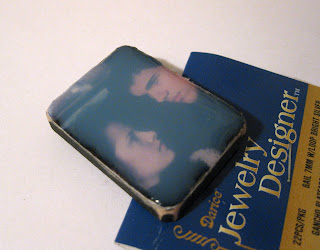
 After it's all filled in, it'll look all hazy like this. It's not ruined, it just needs to dry. Make sure it's level (this would be a good reason NOT to put your loop on the back yet, but mine is propped up on one end to make it lie flat).
 Now walk away!!!
Do not allow yourself to be tempted to test to see if it's dry. The safest bet is leave it alone for the rest of the day and/or night, otherwise your project will be ruined by fingerprints, dents, ripples, etc.
When it's done it'll be all shiny and will not crack (like embossing powder).
Now walk away!!!
Do not allow yourself to be tempted to test to see if it's dry. The safest bet is leave it alone for the rest of the day and/or night, otherwise your project will be ruined by fingerprints, dents, ripples, etc.
When it's done it'll be all shiny and will not crack (like embossing powder).
Now it's time to apply the Glossy Accents Clear Dimensional Embellishment. Never shake this stuff. You don't want air bubbles in it. They don't disappear and get trapped over your image. Not a great look.
Slowly let the stuff flow to the tip. I like to outline my tile first then slowly and patiently fill it in.
It is applies very thickly.After it's all filled in, it'll look all hazy like this. It's not ruined, it just needs to dry. Make sure it's level (this would be a good reason NOT to put your loop on the back yet, but mine is propped up on one end to make it lie flat).
Now walk away!!!
Do not allow yourself to be tempted to test to see if it's dry. The safest bet is leave it alone for the rest of the day and/or night, otherwise your project will be ruined by fingerprints, dents, ripples, etc.
When it's done it'll be all shiny and will not crack (like embossing powder). The shine doesn't show up well, but it's there and it makes all the difference!
Enjoy!
--C


3 comments:
WOW! You going to wear those to the New Moon premiere....I love that your hardcore.
I love this idea! What kind of bail did you use?
Cool! Great tutorial. Thanks for sharing. I will link in an upcoming blog post.
Post a Comment