Friday, October 30, 2009

The Start of Something Big: Countdown with Crafts

With the holidays just 'round the corner and tight budgets everywhere, we thought we'd do something that will help you fill your Christmas gift list with fun crafting ideas.

Each week on Tuesday, we will feature a craft with products featured in the ads of various chain craft stores. We realized that using the ads isn't going to be helpful for everyone, but the inspiring craft ideas will! As a kick-off, I offer the following:
Wooden-framed magnet boards often go on sale (or you can always use your large percent discount coupon). I used an inexpensive red spray paint (after removing the steel insert).
I am using this in my craft/inspiration room as a home for all my Magnetic Poetry. I love the stuff, but haven't had a place for it, especially since I've been raising little ones.
I wanted to use rub-ons in poetic flourishes as an embellishment. Not only were there no rub-ons on sale, I couldn't find any I liked well enough anyway.
However, the acrylic stamps were on sale at Michael's and they had a great selection of said flourishes.
I was a little doubtful as to how they'd turn out because the only black ink I had was StazOn, but as you can see it turned out well! The clear stamps are Inque Boutique brand. The nice thing about stamps like these is not only can you see when you stamp with them, but you can place them where you think you might want them before you stamp.
Here's a stamping detail.And the finished piece (sorry about the bad lighting) and I'm really pleased with it.
Remember to check us out on Tuesdays for our Countdown with Crafts posts, all the way till Christmas after we get a chance to check the ads. Look for our other posts as well.
--C

Tuesday, October 27, 2009

Product Challenge: Buckets

Our product challenge this month was buckets! (I can't lie to you, I was super excited because I already had a project done with buckets that I hadn't posted yet). So all I had to do was take a picture. Do you love the dollar section at Target as much as I do? Well, they often have buckets. So, awhile back I bought several buckets at Target to keep my ribbon in. I made a template out of paper for the bucket, then used my scraps of scrapbook paper and covered the buckets with every color of the rainbow... and then some! I then tied little scraps of ribbon on the handle of each bucket. This helped organize my obsession with ribbon (well, at least the smaller pieces. I have the full rolls of ribbon just in a cupboard... I really like ribbon). Hey, let me know if you want to see pics of my whole craft room sometime and I'll try to clean it up to make a post!!! Just leave me a comment.

So, the ribbon ones are totally cute, but you can't forget my favorite bucket of all..... my thread bucket. I love this thing. I keep it next to my sewing machine so when I clip off the thread I have a quick place to throw it!!! -Anisa:)

My bucket project ended up not being a craft but an organizational project. I had been reading Pretty Organized Palace's blog and one post in particular caught my attention. She was sharing some fun ways to cozy up the home for fall and winter. With my inspiration starting there, I headed to my local Hobby Lobby and purchased this large bucket/basket. At home I filled it with all my yummy yarn for crocheting (and one day hopefully knitting) and placed it by the fireplace. I love how it makes my family room just that much more comfy cozy with the bonus I have yarn storage in plain sight.

-Ang

Check out these darling buckets that one of our readers... Shellie... sent into us. Super cute storage. Here's what she says about them,

"Here is what I have been doing with buckets. I only have 3 done. I still want a ribbon one and thread etc… I just bought some for a couple of dollars and spray painted them, cut out vinyl on my Cricut for the letter."

Way to go Shellie!

Wow! 50!

Just a quick thanks to all our followers... There are FIFTY of you now and we're so excited! Thank you to all our readers for helping us build up Twiddle-Thumbs! We've been having so much fun!

Saturday, October 24, 2009

A little bit of decor in my master bath

So I have this fun little alcove in my master bath where the bathtub is. Kinda boring, right? I started with this window that I had purchased for $1 at a yard sale. It was white and I spray painted it black. Kind of a little boring by itself.
I was over visiting Trey and Lucy awhile back and saw this cute idea. And what do you know.... a few weeks later, I found this wreath at a yard sale for $2! I totally knew what to do with that!
On the wall above the towel rack, I was thinking of doing some vinyl of some sort. But you know how much I love wood and all of my wood crafts.... So what I did instead, was I used my Cricut and the Storybook cartridge (which I borrowed from a friend in July and really need to return). I cut the little bird swirly thing out as big as I could do it.... 12x24. Used that as a pattern and cut it out of wood. It's fun to have a nice black silhouette but actually have some dimension to it. By the way, I will be selling these at the Seedlings boutique coming up in a couple of weeks!!! Or, you could buy one from me directly if you're interested, just send me an email at anisascholes@gmail.com
And here's the semi-final product. I'm thinking it needs a little color, so I'll probably get some ribbon to add to the wreath and what-not. Leave a comment and let me know what you think! -Anisa

Thursday, October 22, 2009

Photo Pendant Tutorial

Start with a small wooden tile or large metal washer...anything flat that could be covered with paper. For this tutorial, I'm just going focus on the wooden tile (purchased at a local craft store). You'll also need it's dimentions later, so measure it. I then painted the tile black. You can leave it the way it is, but painting it a unifying color looks good.Next look on the internet or at your own photos or create something that can be printed. I wanted to make something special for my friend, Ane, so I looked at pictures from New Moon for Jacob Black.Photoshop comes in handy here, but if you don't have it...later. When you open up the photo you want to use, click on the Crop tool. You can set the shape of the crop it will do to the dimentions of your tile (that you measured, remember?) The orange arrow is pointing at this feature.
If you don't have Photoshop, just drag the photo into a Microsoft Word document and play with the size in there till you think it'll be just bigger than your tile.
Print out your picture on regular printer paper and cut it out.
When the paint on your tile is dry, paste the photo onto it.
I used a SMALL bit Ranger Ink's Glossy Accents Clear Dimensional Embellishment, pressed the photo firmly to the tile and wiped away any leaking adhesive coming out of the sides. I put it face down with a weight to keep it flat and left it for several minutes.
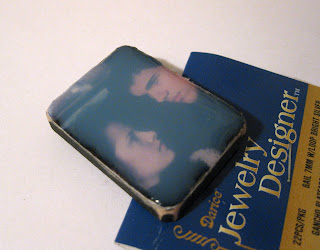
At this point, you can attach a bail or some other type of loopy finding on to the back of the tile so that you'll be able to wear it. You'll need a serious glue for this. E6000 was used here.
When the glue is dry, sand the excess paper away.
You can touch up the paint on the sides now or later, if you want. Or you can have a more distressed look.
Personally, I just look in the mirror for a distressed look.
Now it's time to apply the Glossy Accents Clear Dimensional Embellishment. Never shake this stuff. You don't want air bubbles in it. They don't disappear and get trapped over your image. Not a great look.
Slowly let the stuff flow to the tip. I like to outline my tile first then slowly and patiently fill it in.
It is applies very thickly.After it's all filled in, it'll look all hazy like this. It's not ruined, it just needs to dry. Make sure it's level (this would be a good reason NOT to put your loop on the back yet, but mine is propped up on one end to make it lie flat). Now walk away!!! Do not allow yourself to be tempted to test to see if it's dry. The safest bet is leave it alone for the rest of the day and/or night, otherwise your project will be ruined by fingerprints, dents, ripples, etc. When it's done it'll be all shiny and will not crack (like embossing powder).
The shine doesn't show up well, but it's there and it makes all the difference!
Enjoy!
--C

Wednesday, October 21, 2009

Twilight Party

Angie and I had wanted to have a Twilight party since the DVD release back in March and finally made it happen last Friday. If you're going to have a party based on a movie, then you've really got to go all the way with it, right?
We did a lot of prep, too bad we waited til Friday to find out how much fun it was to do it together.
We did a lot of playing around with food and had some fun games.
We made party bags for everyone that included special necklaces (tutorial tomorrow!) that they could wear that night as well as to the midnight showing of New Moon (for which we all had tickets already). It also had mini packages of New Moon edition "Sweetarts," some butterscotch candies (Edward's eyes), a package of "dazzle" gum and a few other things to use for our games.
First, we played Sculptorades (a la Cranium) and it broke the ice for everyone and they had a blast! The prize for the winners was Edward truffle bars. The losers got Jacob truffle bars. We did three rounds of quote chases. (Everyone brought a copy of Twilight). Each time a person found the quote they got a string a fish to represent Charlie, Bella's dad.
We used 12" dowels with clear thread, wire and large Swedish fish. The person that guessed the final quote received a bottle of La Victoria salsa (representing Victoria).

While we watched the movie, we'd occasionally stop it and ask about the differences between the scene just viewed and the book. The first person with the correct answer would receive a small bag of gummy bears representing Emmett Cullen. They would also be able to hold the gorgeous pillow with Edward Cullen's photo printed onto it that Angie made. If, during the movie, you pointed out any additional differences, then you could steal the pillow. That was so much fun! The person holding the pillow at the end of the game got to keep it. Our final game revolved around the food at the party. As stated before, the food was all character based. Each guest was given a blank list where thirteen characters and their corresponding foods could be written down. The person with the most correct answers would win the grand prize of a black scarf made by Cami. The person with the least correct got stuck with a box of Newtons.

(this was pasted to a package of Fig Newtons)

More examples of Twilight related food (keep scrolling for the entire list):

(this was wrapped around a bottle of Dr. Pepper)

Here is the awesome Twilight cake our friend Tiffany did to represent Alice Cullen

The list:
  1. ice-Rosalie Hale
  2. Dr. Pepper-Carlisle Cullen
  3. Popcorn (base)balls-Esme Cullen
  4. Lil' Smokies-Jacob Black
  5. Swedish Fish-Charlie Swan
  6. bread sticks-Bella Swan
  7. Sweet and Sour Chicken-Jessica Stanley
  8. Fig Newtons-Mike Newton
  9. Gummy Bears-Emmett Cullen
  10. Cake-Alice Cullen
  11. White Hot Chocolate-Jasper Hale
  12. La Victoria salsa-James and Victoria
  13. butterscotch disks/apples/cold mint gum-Edward Cullen

One of our guests, Crystal was our big prize winner, snatching up both the Edward pillow and the scarf, but she surpised us, by showing us this amazing Jane cape she made to wear to the New Moon premier. She didn't use a pattern at all. Amazing! We'll have to keep an eye on Crystal's creations!

Happy Twilight!! Come back tomorrow for a movie necklace tutorial (we're wearing ours, if you look closely).

Tuesday, October 20, 2009

Attention: Crafters!

We at Twiddle-Thumbs get to be part of a great event happening in January called "Get Down with Scrapbooking." Its an annual crop that benefits the Utah Down Syndrome Foundation. Not only is it a great way to crop the night away, but there are endless chances to give to this wonderful charity. Registration for the event (January 22nd-23rd) will open very soon.

(that's Anisa and me on the far right)

In the mean time, we wanted to give you crafters, our readers, out there the opportunity to donate something fun and wonderful to the event. Whatever you make, what ever you do, can be used as a silent auction or raffle item to bring more money to the UDSF. If you are interested in donating a hand-crafted item, email us at twiddlethumbs@rocketmail.com and we'll give you the information you need to do so. You'll also receive a bit of advertising for your Etsy shop or business. All the proceeds go to the Foundation.

(just some of the amazing and fun prizes from last year)

Thanks for reading through this and for reading our blog!

Cami, Angie, and Anisa

Wednesday, October 14, 2009

1 Craft 3 Ways: Little Monsters

I was a little nervous doing something with monsters for October. Not that I'm scared of them. ;) I couldn't think of anything to make that had to do with monsters. Until this morning. My kids and I were hurrying home from running errands so we could play with a little friend of ours. A playdate....hmmmm....(Can you hear the wheels starting to turn?) The light bulb went on-a way to get my craft done and entertain the kids. They would do my monsters for me! Brilliant!
First I had my son and his buddy each draw me a fairly large and simple monster. This is what I got:
Next, I opened my overflowing box of felt scraps and started cutting, sewing, and adjusting as needed.
Let me introduce you to Fire Dragon and Hem:
And Fire Dragon with Hah (Hem's other side):
The boys loved them. Using the kids art work to create crafts was such a fun way to capture their little imaginations for a long time! Ang

I was so excited to do Monsters. I just recently bought monster bedding from Target for my little boy's room. But I hadn't gotten to the decorating part yet. So, I thought I'd do a little paper piecing.... It's not like I haven't done it before! -Anisa

I've got a couple of monster projects going on at the moment, but this is what was done in time for our post today.
Do you remember those ATC cards I mentioned a bit ago, checking for interest? Well I found an excellent site that regularly does card swaps and I joined a few of them. This is my first card for the theme of Monsters. It's a baby monster's first portait. How nice it is to kill two birds with one stone! I might toss another one of my monster-themed crafts onto the blog later this month, but in the mean time, come up with your own! October is an awesome month to immerse yourself in creepy-crawliness. --C

Tuesday, October 13, 2009

Thanksgiving Wood Craft Workshops

I can't believe October is half way over... where has this month gone?

Craft Projects this month.....

Square Wreath: $25. I am so excited about this wreath. I hunted all over trying to find these square wreaths... they are very hard to find. This wreath will make a perfect Christmas gift... get your gifts taken care of early!!! We will cut your vinyl out when you come to the class. You can personalize it with your last name or have it just say welcome. It would look great on the door or on a wreath hanger or hanging in your home. I think I'm making a few for Christmas gifts!!! I will have Black, White, Brown and Cream Vinyl. I have quite a few different paint colors, but if you have something specific you want, bring it. I will also have a few colors of ribbon. Turkey Trio: $8 (sorry I had to up the price a little, but these little guys have the bead board. If you still need the stands they are $3) Thanksgiving Yard Stake: $18 This trio is such a great decoration for Thanksgiving. For those of you who don't do the yard stakes, this will be perfect sitting on a shelf. I will make the sign a little smaller and make a base to put the trio on. It's about 12" tall by 18" wide. Dates: Tuesday, Oct. 20th 6-9 pm Wednesday, Oct. 21st 1-3 pm (I have added a day time class. Please don't bring children unless arranged with me. It will be hard enough with my own kids there, but if we don't have too many kids, I can do it.) Thursday, Oct. 22nd 6-9 pm Wed. Oct. 28th 6-9 pm Just as a reminder, this is how craft class works. I supply all of the wood, paint, brushes, etc. You come and paint your own craft and go home with a finished product. All you need to bring is your money and an apron if you would like:) Please let me know what you would like to make by this FRIDAY... Oct. 16th if at all possible.

Thursday, October 8, 2009

Cupcake Hotpad

I had so much fun with my "name the dress form" contest last month!!! It was fun watching Brown Sugar and Poly Ester so close the whole contest. I felt bad when Brown Sugar only lost by 5 votes. So, I came up with this cute little hot pad for a consolation prize.
It turned out really cute and how fun to have a cupcake hotpad! I sent it in the mail a couple of days ago, so I hope you get it soon!

Wednesday, October 7, 2009

Super Quick Placemat Pillow

We've had fun with place mats in the past, (see here) and now we're going to have a little season fun with them. Behold the place mat pillow!

Instructions?

  1. Find an adorable holiday themed fabric place mat.
  2. Cut a piece of coordinating fabric to the same size as the place mat.
  3. Place right sides together and sew around 3/4 of the edges with a 1/4" seam allowance.
  4. Turn right side out and stuff to desired firmness
  5. Discretely sew open end shut
  6. Enjoy your fun new throw pillow that required no embroidery, applique or Ric-Rac.

Want another quick Halloween/Fall pillow idea? Check out this one at la*T*da!

Monday, October 5, 2009

The Holidays

I love the holidays. I love the changing leaves and the crisp air, making fun costumes and treats,

finding ways to show gratitude for my blessing, being with family, carols, brightly lit trees, etc. WAIT!!!!! Whoa, whoa, whoa....Hold on a second. What's the date? It's already October?! The holidays are here, like it or not.

I am not a planner when it comes to planning daily routines, jobs or meals. But when it comes to the big things, I like to think I do pretty well at planning and staying on top of things. I thought I'd share my holiday planner with you. Feel free to tweak as necessary to fit your family and needs, but please don't sell this. (Unless you send me some of the profits. wink, wink.)

My organization journey started about 6 years ago. I joined FlyLady and in the midst of all my emails from her was one that boasted a free downloadable (is that a word?) holiday planner promising a season of ease and comfort and free from the craziness and stress that unfailingly seems to creep in every season. I grabbed it from her site and have used it every Christmas since. (If Christmas isn't your thing, it would be pretty easy to alter to fit your December celebration needs.) Last year, I added a Halloween planner and making it's organizational debut is my Thanksgiving planner. I could not survive the 3 month holiday season without it. It is quite literally a portable brain.

(Side note-my favorite part of the planner is not only do they have a section for gifts to buy- but also one for gifts to make!)

For my planner, I use a regular 1/2" binder. I slipped a cover page in the front and each holiday has it's own divider (kept in a page protector). As you can see, I kept them simple but festive. Following the dividers are my planning pages for each holiday. There are places for shopping lists, traditions, decorations, food, etc. Be hind each set of planner pages I like to keep some notepaper for random notes that don't fit elsewhere. In the Christmas section, I do keep the Christmas card page in a page protector. It gives me an easy place to store stamps, address labels etc. until I am ready to put my cards together.

I hope this makes your holiday season go much smoother. It definitely has helped me.

Halloween:

http://www.4shared.com/file/136874795/5b3716e3/Halloween.html http://www.4shared.com/file/136874799/52815ac8/_2__Halloween.html Thanksgiving: Christmas: