


 First gather yourself a bunch of felt.
 I used for a template my Creative Memories cutting templates and traced them with a fading fabric marker. The measurements of the ovals are: Bear is 6 3/4" x 4 1/2" and Spaceman is 5 3/4" x 3 1/2" (starting dimensions).
 Before cutting begins, draw a single antennae or ear for what ever you're making. Cut around the shape, but only until you can match up the widths' ends and trace around the one cut out antennae or ear so that you have a matching set (I use this method because it's hard to get a matching set, especially free-hand as I like to do).
 Cut out the same shape out of another color for the back, but do not cut out the smaller inner circle. Choose a piece for the face (it doesn't have to be pretty) and free-hand cut out some hair for the spaceman, or none for the bear.
 Then line them all up, pin together and front sew them all together with just a tiny seam.
 Draw a face on the felt with your fading fabric marker and embroider it BEFORE you sew the piece together.
 Place right sides together, pin and sew with a 1/4" seam.

Stuff it (sorry, switching to the bear) with Poly-fil AND the secret ingredient...a used baby-wipes wrapper or other crinkle-y, plastic-y type item (not shredded, whole, for safety) and give the baby the noise he wants!

Second item: a crocheted baby wash-mitt.

Using COTTON yarn (I used The Original Sugar 'n Cream cotton yarn in Cool Breeze Ombre) and a size H hook, chain 21.
Turn and single crochet (sc) in first chain from hook and in every chain across.
*Chain one, turn and single crochet in first sc from hook and in every sc across.
Repeat from * approx. 44 more rows (total 46) or the measurement of the adult had it will fit with the crocheted strip folded in half.
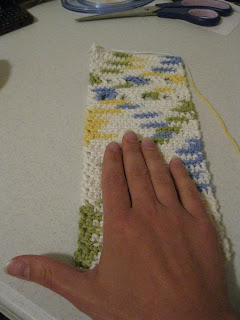 After the strip is at the desired length, do not finish off, but leave approximately 32" of extra yarn attached. Pull it through the last sc so the strip doesn't unravel. Thread the yarn into a large eye needle, fold the strip in (over the hand) and whip stitch up on side.
 So that we don't have to cut the yarn and weave in multiple ends, lead the yarn over the top of the mitt uniformly in the loops all the way across, then whip stitch down the other side.
  Weave in any stray ends and your mitt is done. Put it over the top of a bottle of baby wash and it makes a charming gift.
 (If you want a bit more of a decorative touch, I replaced two sets of two rows with one row each of double crochet following a pattern (from the regular sc row) chain two, double crochet in first sc from hook. Double crochet in next two sc, *chain two, skip next two sc, double crochet in next two sc. Repeat from * three more times (end) then continue the sc pattern. I only recommed the decoration for the back of the mitt and not the front where you'd use to wash baby. )
After the strip is at the desired length, do not finish off, but leave approximately 32" of extra yarn attached. Pull it through the last sc so the strip doesn't unravel. Thread the yarn into a large eye needle, fold the strip in (over the hand) and whip stitch up on side.
So that we don't have to cut the yarn and weave in multiple ends, lead the yarn over the top of the mitt uniformly in the loops all the way across, then whip stitch down the other side. Weave in any stray ends and your mitt is done. Put it over the top of a bottle of baby wash and it makes a charming gift.
 (If you want a bit more of a decorative touch, I replaced two sets of two rows with one row each of double crochet following a pattern (from the regular sc row) chain two, double crochet in first sc from hook. Double crochet in next two sc, *chain two, skip next two sc, double crochet in next two sc. Repeat from * three more times (end) then continue the sc pattern. I only recommed the decoration for the back of the mitt and not the front where you'd use to wash baby. )
email us with any questions: twiddlethumbs@rocketmail.com
--C


3 comments:
I love, love to crochet and that looks super easy! Thanks for the new idea!
What a great post and blog! I’ve enjoyed my time here!!!! Really this is great gift collection for the babies
These are the greatest.You have done nice job..Thank you for sharing!!!
Send gifts to pakistan from usa
Post a Comment