


 As many of you know, I have been holding wood craft classes in my home for a few months. A lot of my crafts are my original designs and I have been working on getting the patterns on a website to sell. So, I am just starting, but I have put my Easter patterns up on a website. My website is Kreative Kuts!!! Right now I only have a few spring patterns up, so click on "SPRING" at the top of the site. The patterns are all E-patterns. You can purchase the pattern through Paypal and I will email the pattern to you. I also have the unfinished wood up for sale as well. If this is something you are interested in, check it out!!!
-Anisa
 My son has a best buddy named Stinky who is an elephant and apparently, according to my little guy, in desperate need of a brother. I was planning on making one for them for Christmas. Well, life got in the way. Then my oldest daughter's birthday rolled around and as luck would have it I was going to be out of town on her special day. Being a mom, I couldn't not leave something for her, but I was trying to stick to a tight budget I'd set for myself. I found all the supplies for the horse in my scrap box.


 I'm not trying to personally promote Lion Brand Yarn, but Angie and I have checked out a few books from the library on amigurumi before and the patterns have left me really confused, but this little book I picked up at Hobby Lobby was really clear and easy to follow.


 First gather yourself a bunch of felt.


 Then line them all up, pin together and front sew them all together with just a tiny seam.
 Draw a face on the felt with your fading fabric marker and embroider it BEFORE you sew the piece together.
 Place right sides together, pin and sew with a 1/4" seam.


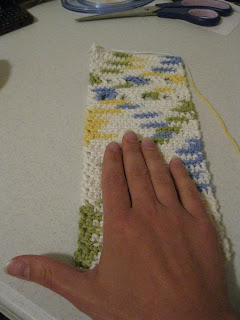 After the strip is at the desired length, do not finish off, but leave approximately 32" of extra yarn attached. Pull it through the last sc so the strip doesn't unravel. Thread the yarn into a large eye needle, fold the strip in (over the hand) and whip stitch up on side.
 So that we don't have to cut the yarn and weave in multiple ends, lead the yarn over the top of the mitt uniformly in the loops all the way across, then whip stitch down the other side.
  Weave in any stray ends and your mitt is done. Put it over the top of a bottle of baby wash and it makes a charming gift.


