Angie and I had wanted to have a Twilight party since the DVD release back in March and finally made it happen last Friday.
If you're going to have a party based on a movie, then you've really got to go all the way with it, right?
We did a lot of prep, too bad we waited til Friday to find out how much fun it was to do it together.
We did a lot of playing around with food and had some fun games.
We made party bags for everyone that included special necklaces (tutorial tomorrow!) that they could wear that night as well as to the midnight showing of New Moon (for which we all had tickets already). It also had mini packages of New Moon edition "Sweetarts," some butterscotch candies (Edward's eyes), a package of "dazzle" gum and a few other things to use for our games.
 First, we played Sculptorades (a la Cranium) and it broke the ice for everyone and they had a blast! The prize for the winners was Edward truffle bars. The losers got Jacob truffle bars.
We did three rounds of quote chases. (Everyone brought a copy of Twilight). Each time a person found the quote they got a string a fish to represent Charlie, Bella's dad.
First, we played Sculptorades (a la Cranium) and it broke the ice for everyone and they had a blast! The prize for the winners was Edward truffle bars. The losers got Jacob truffle bars.
We did three rounds of quote chases. (Everyone brought a copy of Twilight). Each time a person found the quote they got a string a fish to represent Charlie, Bella's dad.  We used 12" dowels with clear thread, wire and large Swedish fish. The person that guessed the final quote received a bottle of La Victoria salsa (representing Victoria).

 While we watched the movie, we'd occasionally stop it and ask about the differences between the scene just viewed and the book. The first person with the correct answer would receive a small bag of gummy bears representing Emmett Cullen. They would also be able to hold the gorgeous pillow with Edward Cullen's photo printed onto it that Angie made. If, during the movie, you pointed out any additional differences, then you could steal the pillow. That was so much fun! The person holding the pillow at the end of the game got to keep it.
 Our final game revolved around the food at the party. As stated before, the food was all character based. Each guest was given a blank list where thirteen characters and their corresponding foods could be written down. The person with the most correct answers would win the grand prize of a black scarf made by Cami. The person with the least correct got stuck with a box of Newtons.


(this was pasted to a package of Fig Newtons)
More examples of Twilight related food (keep scrolling for the entire list):

(this was wrapped around a bottle of Dr. Pepper)
Here is the awesome Twilight cake our friend Tiffany did to represent Alice Cullen

The list:
- ice-Rosalie Hale
- Dr. Pepper-Carlisle Cullen
- Popcorn (base)balls-Esme Cullen
- Lil' Smokies-Jacob Black
- Swedish Fish-Charlie Swan
- bread sticks-Bella Swan
- Sweet and Sour Chicken-Jessica Stanley
- Fig Newtons-Mike Newton
- Gummy Bears-Emmett Cullen
- Cake-Alice Cullen
- White Hot Chocolate-Jasper Hale
- La Victoria salsa-James and Victoria
- butterscotch disks/apples/cold mint gum-Edward Cullen

 One of our guests, Crystal was our big prize winner, snatching up both the Edward pillow and the scarf, but she surpised us, by showing us this amazing Jane cape she made to wear to the New Moon premier. She didn't use a pattern at all.
Amazing! We'll have to keep an eye on Crystal's creations!
One of our guests, Crystal was our big prize winner, snatching up both the Edward pillow and the scarf, but she surpised us, by showing us this amazing Jane cape she made to wear to the New Moon premier. She didn't use a pattern at all.
Amazing! We'll have to keep an eye on Crystal's creations!
Happy Twilight!!  Come back tomorrow for a movie necklace tutorial (we're wearing ours, if you look closely).


 I started with this window that I had purchased for $1 at a yard sale. It was white and I spray painted it black. Kind of a little boring by itself.
 I was over visiting Trey and Lucy awhile back and saw this cute idea. And what do you know.... a few weeks later, I found this wreath at a yard sale for $2! I totally knew what to do with that!
 On the wall above the towel rack, I was thinking of doing some vinyl of some sort. But you know how much I love wood and all of my wood crafts.... So what I did instead, was I used my Cricut and the Storybook cartridge (which I borrowed from a friend in July and really need to return). I cut the little bird swirly thing out as big as I could do it.... 12x24. Used that as a pattern and cut it out of wood. It's fun to have a nice black silhouette but actually have some dimension to it. By the way, I will be selling these at the Seedlings boutique coming up in a couple of weeks!!! Or, you could buy one from me directly if you're interested, just send me an email at anisascholes@gmail.com
 And here's the semi-final product. I'm thinking it needs a little color, so I'll probably get some ribbon to add to the wreath and what-not. Leave a comment and let me know what you think!
 -Anisa
 Next look on the internet or at your own photos or create something that can be printed. I wanted to make something special for my friend, Ane, so I looked at pictures from New Moon for Jacob Black.
 Photoshop comes in handy here, but if you don't have it...later.
When you open up the photo you want to use, click on the Crop tool. You can set the shape of the crop it will do to the dimentions of your tile (that you measured, remember?) The orange arrow is pointing at this feature.
Photoshop comes in handy here, but if you don't have it...later.
When you open up the photo you want to use, click on the Crop tool. You can set the shape of the crop it will do to the dimentions of your tile (that you measured, remember?) The orange arrow is pointing at this feature.

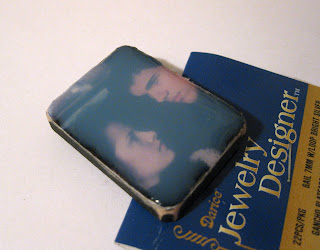
 At this point, you can attach a bail or some other type of loopy finding on to the back of the tile so that you'll be able to wear it. You'll need a serious glue for this. E6000 was used here.
 You can touch up the paint on the sides now or later, if you want. Or you can have a more distressed look.
  It is applies very thickly.
 After it's all filled in, it'll look all hazy like this. It's not ruined, it just needs to dry. Make sure it's level (this would be a good reason NOT to put your loop on the back yet, but mine is propped up on one end to make it lie flat).


 (that's Anisa and me on the far right)


