Tuesday, December 30, 2008

Christmas Crafts to Give

Ok! Here is a sampling of projects I made and have given away. The only thing missing is the collection of doll clothes my mom and I made for my daughter and an apron for my Grandma. I'll get some up soon.
First up, my SIL's and I decided to give my MIL a break for Christmas (meaning we took Christmas dinner over). With this as our inspiration, my SIL, Karamie, made a beautiful table spread.
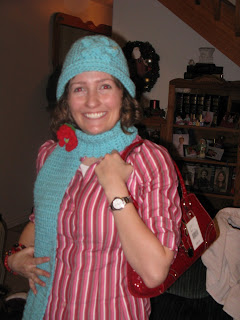
Next, my winter 2008 obsession is hats and scarves. As I have recently learned to crochet, I was very inspired to make this hat/scarf set for my trendy SIL , Sally. To complete it (and to add a bit off fun to the aqua) I added a bright red felt flower pin. (See here for more info.) This is what the pin looks like up close:
For my FIL, who came to stay with us for Christmas, a "golden plates" tie tack made with sculpy clay. The kids also made hot dogs, a Christmas tree, and some more...um...abstract tacks.
For my MIL and SIL who were also with us on Christmas, a hat and glove set (think $1.49 each at target!) Adorn it with a colorful felt in, and you have a fashionable accessory set!
For the newly wed cousin who loves to cook, a sweet new apron, paired of course with a church cookbook (not pictured) and some crocheted dish cloths (also not pictured-but will have to in the future-love them!).
And, last but not least, for the little princess cousin: her very own doll, Nora. This pattern came from The Black Apple and you can get your very own FREE pattern here (You can also buy them on Etsy.)

Phew! Christmas was super busy and I'm glad it's done for another year! I'll be on the lookout for some fun Valentine-themed projects and any great ideas for that special holiday (both husband and family related)

I hope each of you had a Merry Christmas!

Monday, December 22, 2008

Wishing You a Very Merry Christmas and Happy Holidays all 'round!

We at Twiddle Thumbs just wanted to wish you the best this week. Thank you for your support and checking us out. We hope you'll be back. We'll be back, too! Join us next week for a gallery of all the crafts we did for others as presents and such. We may even post a few that we receive as well. So until then... Good luck with all those last minute craft projects we know you took on despite what day the calendar says it is!

Friday, December 19, 2008

And the Stockings Were Hung

Last year my daughter's socking wore out. She's only six. And, no one wears a Christmas stocking! Obviously, I had bought it at the dollar store. She has had me on the hunt this whole season for a new one, but either they are too expensive, not cute enough or both. I decided that she needed one made especially for her by her mom. I am very happy with the final results and she loves it too. (I'm sorry for the blurriness-my camera is being a little picky lately I used a different stocking for a pattern and pieced it together. There is pink rickrack trim between the two different fabrics on the cuff (to hide that seam). The letters are cut from felt using an old scrapbooking alphabet template and hand-sewn on using contrasting embroidery floss. The flower is made of felt and also hand-stitched onto the sock. (I got the idea for the flower at A Feathered Nest and the instructions are at this cute site.) I finished off with a ricrac loop (not sure if I love that part-may still change it) to hang the stocking with.

Wednesday, December 17, 2008

Towels in Triplicate

For our 'One Craft, Three Ways' feature, Anisa came up with the fun idea of decorating our own Christmas dishtowels. I think I was the most hesitant to do this project. What in the world was I going to do with a towel? For Christmas??? But not having any fabulous (or otherwise) ideas of my own to contribute, I went along with it. I managed to fly solo to Hobby Lobby where I bought some Christmas-y fabric, not totally loving it or knowing what to do with it. Then....I'm not sure what happened...but all of a sudden I knew what to do! Remember back in the day when all dishes were done by hand? I remember my favorite dish towels, though slightly gray from years of dish-drying and counter-wiping were my moms flour sack towels that someone (probably her) embroidered. They were the best. No towel could dry a dish faster or better! Anytime I have to hand dry the dishwasher overflow, I've found myself wishing for those wondrous towels. And now....TA DA! Here they are!! These amazing and adorable designs come from Wee Wondefuls. You can get the patter free here. Of course I had to do both the boy and girl elf. They are way to cute to do just one! -Ang

I love buttons. I think it comes from my love of scrapbooking and having texture and dimension on my pages. I'm not exactly sure where I came up with the idea (my own brain, I guess). I decided to sew buttons in the shape of a tree on my dish towels. Here they are. It's a little impractical to dry your hands on (you have to dry them on the side) but it's way cute!!! -Anisa

I had a lot of great ideas floating around in my head for this one, but being severely limited by my lack of sewing maching I had to try other things.

After several failed attempts at as many ideas, I settled into something familiar...crocheted snowflakes. My tree is covered with them. I made them the during the second year of my marriage and they're still going strong. Anyway, it really stands out on the black towel that matches my kitchen.

--C

Monday, December 15, 2008

Monday Discovery: Paper Genius

At http://www.craftstylish.com/ there is a contributor that is a paper creation genius! Jeffery Rudell's latest post is this gorgeous silhouette nativity. This is definitely something I would love to do. Here is the link to his instructions.
I also loved his 'snow storm.' As a replacement to handcut snowflakes in the window (which I was actually going to do with my kids today), he suggests putting together a simple concoction of dental floss sandwiched between white dot labels. The result is whimsical and modern and I love it!
Three more links to his posts that are worth checking out:

Saturday, December 13, 2008

Letters to Santa

I just wanted to show everyone this cute Christmas craft I made.

Supplies:

  • Crystal Light container
  • 1 sheet of scrapbook paper
  • glue
  • wire
  • paper piercer
  • ribbon
  • embellishments

I had saved my Crystal Light container to make a bank for my son. Then I saw an ornament at Target that was similar to my tube and it inspired me. I simply cut out scrapbook paper and glued it arounf the container. I cut circles to glue on the ends. I poked holes in the container to put the wire through and embellished the wire with ribbon and a few metal charms. My boys wrote letters to santa and put them in the tube and hung it on the tree. Santa snuck in at night and took the letters and left them letters in return.

-Anisa

Friday, December 12, 2008

Family Tree

During this time of year our hearts turn to our families and when I saw these simple, excellent trees (just $5!) at IKEA, I instantly knew what I wanted to do with them!
I started out by making a family tree for myself, but then I realized that my mother-in-law would absolutely love this and I set out to make one for her first.
I began by drawing the leaves on regular white card stock in waterproof ink. Since I did it free hand, I had to re-do a lot, but for just 18 leaves it wasn't a big deal. Then I wrote the name and birth year of each person on the family tree (using the waterproof pen).
I also made a plaque with my husband and his siblings for the trunk.
Next I used water colored pencils (3 of them) to color in the shading on leaves. Watercolor pencil marks can be washed over with water on a brush to blend the colors and I used this technique. After the leaves were dry, I pressed them into a clear embossing pad and used Ultra Thick Embossing Enamel (UTEE) and a heat gun to give the leaves a gorgeous shine as well as make them stronger.
To hang them on the tree, I used a box cutter to cut small grooves into the plastic coating on the tree. I looped wire through a small hole on the leaf stem, added some beads and tied a simple square knot at the back. I set the wire loops into the grooves and added some super hold glue with a really fine tipped tube. Voila! A family tree! (now, how am I going to wrap this thing?)
--C

Did you try one of the crafts on our site?

If you did, we'd love to post a picture of it on our blog!Just send a digital image of your creation to twiddlethumbs@rocketmail.com It's kind of like seeing your name in lights, but it's on your computer screen instead...

Thursday, December 11, 2008

answering craft class questions

I'm sure my friend Shannon would love to have more people attend her classes. She does the class a month ahead. For instance, last night I made my snowman wreath for January. She is done with classes for December, so her next classes will be at the beginning of January and they will be Valentine crafts. She does a wreath every month and two other crafts. Usually one of the crafts is a hanging set of letters. The wreaths are $20 and the other crafts are usually a little less than that. All you need to take with you is your money. She supplies everything you need. Email me at twiddlethumbs@rocketmail.com and I can forward her next class schedule to you. She lives in South Jordan. -Anisa

Wednesday, December 10, 2008

Nativity Wreath

I have a friend that teaches craft classes in her basement. She sends out an email with a choice of 3 crafts. We sign up for the craft and the date (she offers about 5 different dates). You go to her house and she has a craft room set up in her basement. She basically has all of the supplies and the sample and you get to chat with friends and craft. I have been going to these classes with my sister in law and we make a wreath every month. This is our cute wreath for December!!! - Anisa

Monday, December 8, 2008

Martha Stewart

First off, I am not a huge MS fan, but-that said- I do like some of her ideas. Some favorites are the glittery pumpkins and a baby quilt made of mens dress shirts. When I discovered these I discovered something else as well. Something I love. She has a new craft project for every day of the week!!! Do you know what that means????? No more crafters block! Wahoo!!! (Not that I'm having any of that...) Click here to go see for your selves all the wonderful things there are to create! Have fun, but don't stay up too late. :) And I will leave you with something to pamper yourselves with, snowballs

-Ang

Friday, December 5, 2008

Spiritual Gifts

Last year we started the tradition of giving a gift to baby Jesus for Christmas (it is His birthday after all.) So I made this cute tin that we put under the back of our tree. After everyone has opened their gifts and things settle down, we take it out and write down the things that we would like to give to baby Jesus. These are spiritual gifts and it helps us to remember the true meaning of Christmas. - Anisa

Wednesday, December 3, 2008

Christmas Ornaments

Each member of my family gets to choose a new ornament every year for the Christmas Tree. This year we thought it would be fun (and thrifty) to make our own. I took clear glass ball ornaments purchased from a local craft store. They are 2 5/8" in diameter. I purchased them last year, but I remember them being very inexpensive (especially with the discount coupon). I had each family member list things that represented them this last year. I used our computer (thank you, Google) to find images to match those lists, printed them off and cut them out. Example: my oldest son had images of a soccer ball (he was on a team), his school mascot (his first year in his new school), piano keys (he began lessons in July), his age and the word Narnia (we finished all the books together). I used "Christmas Shred" to fill in the center and force those tiny pieces of paper against the glass. It took some patience and a few long, skinny tools, but I finished them. --C

Tuesday, December 2, 2008

Early Gift Craft

Angie turned me on to this simple necklace design that would make a great Christmas gift for any female on your list. If you are even mildly interested in trying to make jewelry, this is a great beginner project. Necklace can be worn as one large strand or doubled up. Here's the simple formula: 2.5 inches of seed beads, medium-sized complimentary bead, the large bead, then the medium-sized bead and repeat. Supplies I used:
  • .30mm silver colored beading wire
  • 2 7" strands Blue Moon Natural Elegance ceramic beads. (These beads are just barely larger than a dime and it came with the complimentary medium-bead though I did have to add four more from my stash.)
  • 2 crimping beads

I repeated the pattern 12 times which left me two large beads with which to make matching earrings.

To finish off, I tied a square knot and put crimping beads on either side. I threaded the extra wire back through the beads for an inch or so.

--C

Sunday, November 23, 2008

Weekly Discovery- Silhouettes

On Mondays we are going to start a new feature called "Weekly Discovery." We will highlight a product or idea the we find on the web, in a book, magazine, etc. Our first feature is on Silhouettes.
The summer after I graduated from high school I had the opportunity to go on a vacation with some friends to France. When we were in Paris, I had a street artist draw a silhouette of me. (by the way, my nose isn't really that big)
I stuck it in my scrapbook and had kind of forgotten about it. A couple of months ago, I was reading a magazine called "100 decorating ideas under $100." It had a feature on silhouettes. I thought they looked pretty cool and was thinking of making some of my family and putting them in my living room. The article featured a website called cutarts.com. He has some great silhouettes on there and you can purchase custom made art from him. Then, a few weeks later, I came across this website called Restyled Home. I loved her profile silhouettes and she gives a great tutorial to tell you how to do them. A few weeks after that, I saw these pillows in a magazine called Creative Home by BH&G. It was the winter 2007 issue. And to top it all off, my son loves the show Tom & Jerry. I was watching it with him one night and I noticed that Jerry had silhouettes hanging on his wall in his little mouse hole. I took all of those things as a sign that I was supposed to make these for my family.
So, I plan on making a profile of each of my 5 family members. I am going to follow the tutorial from Restyled Home and make my profiles black with a white background. I will put them in black picture frames and hang them on the wall in my black and white living room. Check back soon to see my finished product.
-Anisa

Friday, November 21, 2008

Gratitude Box

One of our favorite parts about crafts is diversity. We each have our own styles. One of the features we want to provide to you on our site is "One Craft- Three Ways." Once a month we will choose a craft that we all like and want to do. Then we will go our separate ways and create. We will publish the final results here for you to see how a blank canvas can turn out three different ways. This month we chose Gratitude Boxes. This a great way for our families to share what we are grateful for. We can add our thoughts to these boxes year after year. We started with a blank box. In this case, a papier mache from Provo Craft, purchased from the local craft store. (box measures 5 1/2" X 5 1/2" not including scallops) Here is Anisa's final result. I decided that I would like to put a chipboard album inside mine to record my families thoughts on what they are thankful for. Here is a glimpse of what the inside of the album looks like. Each person has a page with a tab on the side with their name on it. Each page has a little paper bag pocket with a card inside. On each card, we will write the year and what we are grateful for.
I wanted a box that my family could contribute to on a monthly basis, so I tried to stay with everyday colors (versus fall colors). The plan is once a month we'll gather as a family and write down things we are thankful for. Come next thanksgiving we will have a great record of our last year's blessings and something fun to read over dinner. As my kids are all small, it will also be fun to see how their handwriting changes and improves. Angie also wanted to use hers throughout the year and so chose colors that fit her home decor rather than traditional fall colors.
Cami went with a simple approach, using semi-traditional Thanksgiving colors. She used 7 Gypsies Graditude sticker sheet to embellish the box as well as the cardstock squares inside. Although Thankgiving is past, you can use this concept for anything. Last year, Anisa used an embellished craft lunch pail to make a box to hold the gifts that her family would give to the Savior for Christmas, such as service to others, etc. May be she'll share it before the month is out.

Sunday, November 16, 2008

Update a Craft

Do you have any old crafts that are just a little outdated? I know I do. My mom got my started on tole painting when I was a pre-teen. I loved it and I really got into it. I made most of my stuff for my mom's house, but a few things I kept for myself. They are all really outdated, so I don't even use them. I think it's about time that I paint them and update them a little. Angie, Cami and I had a yard sale a couple of days ago. Angie's mom gave her this turkey to sell. I kept looking at it and wondering if there was anything I could do to fix it. Then I remembered a card I had seen in a scrapbook store. They had cut a circle for the turkeys head and body and the tail was made out of ribbon. I LOVE RIBBON. So, it finally dawned on me that I could do the same thing with this turkey. I pulled all of the rafia off. I sanded and distressed the turkey a little. Then I tied ribbon on the tail in place of the rafia. I used several different colors, patterns and styles. Some of them were just from my stash at home and I bought a few new ones because I don't have a lot of wide ribbons. Here it is... let me know what you think!!! I bet Angie wishes she hadn't gotten rid of this at her yard sale. - Anisa

Tuesday, November 11, 2008

Arrange-a-frame

12 screws. 6 frames. A big wall. One woman. Thanks to some random home decorating show on TLC (not one I was familiar with) and Pottery Barn's catalog (my home decor study guide), I have a very nice arrangement of our recent family pictures. The pictures are cute and the frames are satisfactory, but how do you hang SIX pictures to form a nice arrangement and keep everything aligned properly?? Let me show you.... First, trace the frames on some paper and cut out --do this for each frame you'll hang. (While you are tracing you can also make marks so you know where to pound in your hardware.) Using painters tape, hang them on your chosen wall and now you have a template! arrange-a-frame-001 Once your arrangement looks the way you want, drill your screws or pound your nails right on top of the paper like so: arrange-a-frame-002 Next, rip the paper off and hang your pictures. Here is my final product: arrange-a-frame-003 Now if I could just figure what to put on either side on my new grouping.....

Throw Pillow Slip Covers

I never buy throw pillows (okay, hardly ever). I feel like I can make them quickly and inexpensively. I'm not a major sewer, but if you can sew straight lines, you can sew this! The first thing that you want to do is measure your pillow. My pillow was 19" square. Then, I cut the fabric for the front of my pillow. You will want to cut your fabric 1" bigger to allow for 1/2" seam allowances. The back of your pillow is going to have 2 pieces of fabric that overlap. This way, you can take the fabric off and wash it easily. To cut the back pieces, you will want them to be half the size of the pillow plus 2-3". So, I cut my pieces 13". Then, you will need to turn over one edge of each of the pieces. These are the edges that are going to show when you have your finished pillow. The next step is to pin your pieces of your pillow together. You will want to lay the front of the pillow on a table, front side up. Then you will want to lay your two back pieces on top of that front sides down. You will want to have your turned over edges on the inside of the pillow, overlapping. Pin all around the outside, then take it to your sewing machine and sew all around the outside edge. Flip your pillow right side out and stuff your old pillow inside!!! This project takes less than 1 hr. (it probably took me longer to post this on the blog.) It also is quite in expensive if you already have a pillow that you are just recovering. All it costs is the fabric. For this one, I used just a little over 1/2 a yard. Good luck and email me if you have any questions. -Anisa

Quick & Cute Bank

My mom bought these letters shortly after my daughter's birth four years ago. I'm so glad I finally altered them. I really like how they turned out. After I was finished, I had enough patterned papter to make a cute little bank out of a Clabber Girl baking soda can. First, I removed the paper label, ran it through the dishwasher, then cut a hole in the lid wide enough to fit a folded up birthday dollar bill. Supply list for bank: One empty baking soda can
  • A few, I used three, sheets of double-sided patterned paper (this is Magical Moments by Daisy Bucket Designs)
  • Paper flowers (Sweet N Sassy Princess by Prima)
  • Rub-on letters (Making Memories Simply Stated Trademark in black
  • Adhesive (Zig Two-Way Glue and Scotch Tacky Glue)
  • Supply list for altered letters: Plain white letters (these were purchased at Wal-Mart 4 yrs ago)
  • Same paper as listed above
  • Same paper flowers as above
  • Adhesive (Mod-Podge)
  • extras: buttons and rick-rack from personal stash

Quick crafts are great. The hardest part seems to be deciding on the best time to sit down and do them. I'm working on another craft right now that I'm really excited about. It isn't quick AT ALL. I can't wait to show it here. Soon! --C