Angie and I had wanted to have a Twilight party since the DVD release back in March and finally made it happen last Friday.
If you're going to have a party based on a movie, then you've really got to go all the way with it, right?
We did a lot of prep, too bad we waited til Friday to find out how much fun it was to do it together.
We did a lot of playing around with food and had some fun games.
We made party bags for everyone that included special necklaces (tutorial tomorrow!) that they could wear that night as well as to the midnight showing of New Moon (for which we all had tickets already). It also had mini packages of New Moon edition "Sweetarts," some butterscotch candies (Edward's eyes), a package of "dazzle" gum and a few other things to use for our games.
 First, we played Sculptorades (a la Cranium) and it broke the ice for everyone and they had a blast! The prize for the winners was Edward truffle bars. The losers got Jacob truffle bars.
We did three rounds of quote chases. (Everyone brought a copy of Twilight). Each time a person found the quote they got a string a fish to represent Charlie, Bella's dad.
First, we played Sculptorades (a la Cranium) and it broke the ice for everyone and they had a blast! The prize for the winners was Edward truffle bars. The losers got Jacob truffle bars.
We did three rounds of quote chases. (Everyone brought a copy of Twilight). Each time a person found the quote they got a string a fish to represent Charlie, Bella's dad.  We used 12" dowels with clear thread, wire and large Swedish fish. The person that guessed the final quote received a bottle of La Victoria salsa (representing Victoria).

 While we watched the movie, we'd occasionally stop it and ask about the differences between the scene just viewed and the book. The first person with the correct answer would receive a small bag of gummy bears representing Emmett Cullen. They would also be able to hold the gorgeous pillow with Edward Cullen's photo printed onto it that Angie made. If, during the movie, you pointed out any additional differences, then you could steal the pillow. That was so much fun! The person holding the pillow at the end of the game got to keep it.
 Our final game revolved around the food at the party. As stated before, the food was all character based. Each guest was given a blank list where thirteen characters and their corresponding foods could be written down. The person with the most correct answers would win the grand prize of a black scarf made by Cami. The person with the least correct got stuck with a box of Newtons.


(this was pasted to a package of Fig Newtons)
More examples of Twilight related food (keep scrolling for the entire list):

(this was wrapped around a bottle of Dr. Pepper)
Here is the awesome Twilight cake our friend Tiffany did to represent Alice Cullen

The list:
- ice-Rosalie Hale
- Dr. Pepper-Carlisle Cullen
- Popcorn (base)balls-Esme Cullen
- Lil' Smokies-Jacob Black
- Swedish Fish-Charlie Swan
- bread sticks-Bella Swan
- Sweet and Sour Chicken-Jessica Stanley
- Fig Newtons-Mike Newton
- Gummy Bears-Emmett Cullen
- Cake-Alice Cullen
- White Hot Chocolate-Jasper Hale
- La Victoria salsa-James and Victoria
- butterscotch disks/apples/cold mint gum-Edward Cullen

 One of our guests, Crystal was our big prize winner, snatching up both the Edward pillow and the scarf, but she surpised us, by showing us this amazing Jane cape she made to wear to the New Moon premier. She didn't use a pattern at all.
Amazing! We'll have to keep an eye on Crystal's creations!
One of our guests, Crystal was our big prize winner, snatching up both the Edward pillow and the scarf, but she surpised us, by showing us this amazing Jane cape she made to wear to the New Moon premier. She didn't use a pattern at all.
Amazing! We'll have to keep an eye on Crystal's creations!
Happy Twilight!!  Come back tomorrow for a movie necklace tutorial (we're wearing ours, if you look closely).


 You spiral the tube around itself, sewing as you go, until you have a pad for a pet to sit on. (I'm not done. I estimate that I have 60% more to do.)
 My little sister's dog, Sadie, is going to love this when I finish it.
This project is reminiscent of those old braided rugs that many of our grandmothers had in their homes at some time or another.
I like doing things like this while watching movies with my husband. I like to keep my hands busy.
Now that I've gotten this far with the project, I'm going to work on designing large amigurumi snakes following a similar pattern to this. I know my boys will LOVE them.
Another note on crochet, check out the Free Form crochet movement via http://www.freeformcrochet.com/ or http://www.marloscrochetcorner.com/freeform.html
It's definitely unique and those who do it, liken it to painting with yarn.
Even Björk Guðmundsdóttir likes free form crochet.
My little sister's dog, Sadie, is going to love this when I finish it.
This project is reminiscent of those old braided rugs that many of our grandmothers had in their homes at some time or another.
I like doing things like this while watching movies with my husband. I like to keep my hands busy.
Now that I've gotten this far with the project, I'm going to work on designing large amigurumi snakes following a similar pattern to this. I know my boys will LOVE them.
Another note on crochet, check out the Free Form crochet movement via http://www.freeformcrochet.com/ or http://www.marloscrochetcorner.com/freeform.html
It's definitely unique and those who do it, liken it to painting with yarn.
Even Björk Guðmundsdóttir likes free form crochet. Sydney asks: So how do you sew it together? My grandma used to make rugs kind of like this. I want to try!
Reply: The instructions say to use a tapestry needle. I was going to weave in and out and use yarn (since it's thicker and will bind it strongly), sewing as I coil it. I'll do it through the center of the tube so that it won't be visible.
Sydney asks: So how do you sew it together? My grandma used to make rugs kind of like this. I want to try!
Reply: The instructions say to use a tapestry needle. I was going to weave in and out and use yarn (since it's thicker and will bind it strongly), sewing as I coil it. I'll do it through the center of the tube so that it won't be visible.
 Instructions: Chain 6 with yellow yarn and join with slip stitch into a ring. Chain 1 then 11 single crochet in ring (12 stitches).
Using white yarn continue [11 chain, slip stitch in next single crochet] twelve times in each single crochet from the first round.
Fasten off and weave in ends.
Next, I lightly misted the flower with water and gently stretched and shaped the petals to how I want them to look and let that dry flat.
I cut pieces of moss colored felt freehand: one petal and two circles for mounting the flower. I used embroidery floss (1 and 2 ply) to bring it all together.
Instructions: Chain 6 with yellow yarn and join with slip stitch into a ring. Chain 1 then 11 single crochet in ring (12 stitches).
Using white yarn continue [11 chain, slip stitch in next single crochet] twelve times in each single crochet from the first round.
Fasten off and weave in ends.
Next, I lightly misted the flower with water and gently stretched and shaped the petals to how I want them to look and let that dry flat.
I cut pieces of moss colored felt freehand: one petal and two circles for mounting the flower. I used embroidery floss (1 and 2 ply) to bring it all together.
 Taking the larger circle, I sewed on the brooch mount.
 When flower is dry, use tiny stitches with floss to attach petals to the felt. You want the petal tips to have free movement, so stitch around the edge of the larger circle and leave them free. Just make sure you stitch into each side of each petal to keep it lying flat.
 Here you have it!

 I'm not trying to personally promote Lion Brand Yarn, but Angie and I have checked out a few books from the library on amigurumi before and the patterns have left me really confused, but this little book I picked up at Hobby Lobby was really clear and easy to follow.


 First gather yourself a bunch of felt.


 Then line them all up, pin together and front sew them all together with just a tiny seam.
 Draw a face on the felt with your fading fabric marker and embroider it BEFORE you sew the piece together.
 Place right sides together, pin and sew with a 1/4" seam.


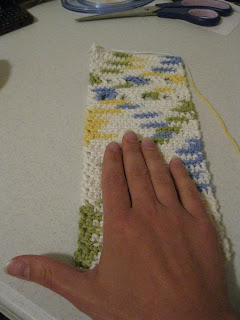 After the strip is at the desired length, do not finish off, but leave approximately 32" of extra yarn attached. Pull it through the last sc so the strip doesn't unravel. Thread the yarn into a large eye needle, fold the strip in (over the hand) and whip stitch up on side.
 So that we don't have to cut the yarn and weave in multiple ends, lead the yarn over the top of the mitt uniformly in the loops all the way across, then whip stitch down the other side.
  Weave in any stray ends and your mitt is done. Put it over the top of a bottle of baby wash and it makes a charming gift.


