


Please come on over and follow me... and update any links or short cuts you may have! I will be slowly changing things on the blog and creating a button and such! -Anisa
Wednesday, February 16, 2011
Larcie Bird
I have decided that I don't want to re-name Twiddle Thumbs. Instead, I have decided to create my own blog.... Larcie Bird. So, I will now be posting at....
Monday, February 14, 2011
Stuffed Mushrooms
I made these for a family party this past weekend and they were a big hit!!!
 Stuffed Mushrooms
 Stuffed Mushrooms
Whole Mushrooms (about 6 packages)
1 lb. country sausageTurkey Stuffing mix
8 oz. cream cheeseBrown sausage. Add stuffing mix and the amount of water that the box recommends (do not add butter because of the sausage grease.) Add cream cheese and stir until melted. Spoon mixture into washed and de-stemmed mushrooms. Bake at 350 for 20 minutes.
-AnisaFriday, February 11, 2011
Burp Cloths Re-visited
Do you remember this blanket I made for my nephew, West? Well, I planned on making him some burp cloths to match... but I ended up making these burp cloths for my friend, Rachel. Well, West is in town (and sadly I don't even get to hold him because I'm sick), so I had a deadline to get his burp cloths made. It was so fun to do the owl thing with boy stuff!
 I added a little ric rac and that turned out cute. And yes, I know the owls are sideways, but that is all of the fabric that I had left over.
 And I am just loving applique right now.
-Anisa
And I am just loving applique right now.
-Anisa
 I added a little ric rac and that turned out cute. And yes, I know the owls are sideways, but that is all of the fabric that I had left over.
 And I am just loving applique right now.
-Anisa
And I am just loving applique right now.
-Anisa
Thursday, February 10, 2011
I'm a "Stylish Blogger"
 Thanks to Krista over at Mom's Mish Mash for the Stylish Blogger Award! It's always nice to know I'm loved!
Along with this award, I am supposed to list eight things about myself. So here it goes......
Thanks to Krista over at Mom's Mish Mash for the Stylish Blogger Award! It's always nice to know I'm loved!
Along with this award, I am supposed to list eight things about myself. So here it goes......
1. I am a mom of 3 boys... I am the only daughter with 3 brothers... My husband comes from a family of 7 boys and 1 girl... We are a "boy" family.
 2. I am a very simple gal... I prefer to wear t-shirts and jeans, I don't wear jewelry or accessorize at all.... kind of funny that I like to make accessories, I just don't like to wear them. The hat is a new accessory because I don't like my hair cut (see #7)
 3. I don't listen to music... I find it to just be one more noise... I'd prefer total silence.
4. I don't like to exercise, but I do it so I won't weigh over 200 lbs. again.

6. I used to be very blond as a kid.

 8. I am super picky about my purses. have to have a purse that slings over my whole body... I don't want to hold it in my hand or carry it.... I also like it to have the perfect pockets. I had the perfect fossil purse and it fell apart... I bought a cheap replacement at Target, that only worked okay... My sister in law found me a super great Fossil purse for me at a consignment store and I bought a Relic purse at Kohls... I'm giddy with new purses!!!
 I also get the opportunity to award a "stylish blogger award" to other sites I enjoy.
1. Nanny Goat ...Super cute ideas...
2. The Coffee Shop Blog... Free Photoshop Elements and photography tutorials.3. Prepared not Scared... this is some ward blog that I happened across, but they have great games for kids.
4. Make it and Love it... the name says it all!5. Studio Calico... I'm too cheap to buy their kits... wish I could... but I still love all of the inspiration!
6. U Create... who doesn't visit this blog often... always where I go to find inspiration.7. Ana White... love all of her furniture plans... still haven't built anything yet, but I promise I will some day!
8. Maggie Homes... I always nominate Maggie! She used to be my neighbor and she is so cute and creative... I love her scrapbooking style (I scraplift her ideas all the time) and I love her photography!To claim your award, save the "Stylish Blogger Award" to your desktop. Post eight things about yourself and give the award to eight other blogs you like.
-Anisa
Quick Valentine's Card
 Just thought I'd post a quick idea for a Valentine's Card!
(I'm just too cheap to spend money on cards at the store:)
I just simply used my heart punch to cut out scraps... I glued them on first, then sewed stitching through!!!-Anisa
Friday, February 4, 2011
A few crafts for my classroom
I am a teacher by profession. I taught highschool French and Chemistry for 3 years and Jr. High Science fo 5 years. I took a break from teaching to have kids. When we moved to St. George, I decided to try to find a teaching job. I was too late to find a job teaching science, but I found an opening as a study skills teacher.... which I love! My students told me that my classroom was boring... so I thought I'd take care of that!!!
 I made this adorable bunting to hang across my boring chalkboard...
 It's always top priority to count down until summer break...
 ... and no classroom can be complete without a calendar. The dates are laminated and attached with velcro so that I can use different dates for each month. ( I have loved having a laminating machine at my disposal)
I used my Cricut a little, the old-style Ellison die cut machine at the school, and a pair of scissors to create all of these crafts! It was also a fun way to use some of my papers that I didn't think I would use on my scrapbook pages.
-Anisa
Thursday, February 3, 2011
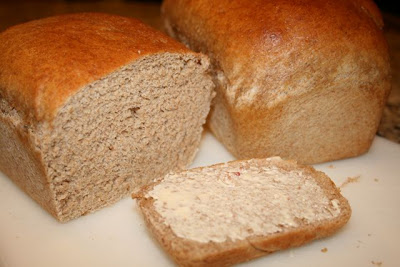
Home made Wheat Bread
I am in no way a food storage guru. But I am trying to work on getting my year supply of food storage. I believe that food storage needs to be used and rotated. My kids are good at using and rotating our brownie mixes, but we need to work on using the wheat and beans and things like that. When we moved my parents a few months ago, we moved laundry detergent, toilet paper and wheat (among other things) that they had in their food storage for 40 years.... not so good at rotating their food storage. I also found a brand new Kitchen Mill Wheat grinder that had never been used. So, a couple of days ago, I decided I was going to grind up some wheat!
 With the wheat grinder, it was a piece of cake! All I had to do was scoop the wheat in and the machine did the work.

 Isn't it pretty? I totally want to have some as a snack right now!
 With the wheat grinder, it was a piece of cake! All I had to do was scoop the wheat in and the machine did the work.

Look at this beautiful wheat flour!
I used this recipe from allrecipes.com. I love allrecipes.com. I love that people leave their reviews with their suggestions. I know there are a lot of other things you can add to your wheat bread that make it fabulous... like gluten. I did not have any on hand... and I made this bread on a whim. I even used more wheat flour than the recipe called for and it turned out fabulous! Isn't it pretty? I totally want to have some as a snack right now!
-Anisa
Thursday, January 27, 2011
A few changes.....
In case you haven't noticed, Cami and Angie have decided to leave Twiddle Thumbs. I even had my moments when I thought about giving it up as well.... but I love crafting and I like to have a place to share my passions with others. So, I'm just not ready to give it up yet! I'm going to miss working with Angie and Cami... I miss living by them as well.
I have a lot of fun changes in mind, so check back often....
-Anisa
Sunday, January 23, 2011
Cloth Diaper Burp Cloths
It's been a busy week for me... and I've had sick kids... no fun. I needed to get a baby shower gift for my friend, Rachel... but just didn't really have time. I live about 20-25 minutes from Target, Old Navy, etc.... and just wasn't up for a drive clear across town. Plus, I really like to make home made gifts for my friends. On my way home from work, I stopped by a little boutique and saw burp cloths... they wanted $20 for them!!!! I had actually purchased some cloth diapers to make burp cloths to go with this blanket... so, I thought, I guess I'll make some girl ones for Rachel. I had minky left over from the blanket... and this super cute fabric that I had bought for a project for my sister in law...(that I never made)... So, I started cutting, and sewing....
 I'm into appliqué right now.... so I appliquéd a flower on the minky to give it a little something extra...
 Here are pics of each burp cloth...

 (I didn't do a tutorial for the burp cloths, but I found a tutorial online at Chickpea Sewing Studio that is similar to the same technique that I used)
 Here's a little tip about your bobbin thread.... it is the thread that shows on the back. So, when doing a project like this, use white bobbin thread... then the thread doesn't show!
 Here are the burp cloths all wrapped up...
 I totally love how they turned out and I hope she likes them too! -Anisa
(PS Shellie... I am still going to make you some to go with the owl blanket)
Friday, January 21, 2011
Nothing a little Appliqué won't fix
I have 3 boys... I pass their clothes down. My oldest son had this lovely jacket from his elementary school last year...
 Well, it's a nice jacket, but he doesn't go to school there... plus it doesn't fit him. So, my second son inherited it. I thought I would try to do a little appliqué to cover up the words.
 I first appliquéd the star... I wanted something subtle, so I went with a gray and black plaid scrap that I had. Then I appliquéd a guitar over the star. To give it a little pizazz, I did a little zigzag stitch in bright blue over the whole thing. It turned out totally cute!!! And my little boy loves it... my hubby was even impressed.
-Anisa
I first appliquéd the star... I wanted something subtle, so I went with a gray and black plaid scrap that I had. Then I appliquéd a guitar over the star. To give it a little pizazz, I did a little zigzag stitch in bright blue over the whole thing. It turned out totally cute!!! And my little boy loves it... my hubby was even impressed.
-Anisa
Tuesday, January 18, 2011
Baby Boy Blanket
Riley Blake Designs has this super cute baby boy owl fabric! When my sister in law and I first saw it, we fell in love with it! Lucky for her, she was pregnant with a baby boy at the time. So, she bought some fabric to make a cute car seat cover.
There is a cute little fabric store that I drive by every day on my way to and from work. I have purposely avoided it because... well, I knew I would spend money there. So, the other day I needed some ric rac for a project (that I need to post about) and I saw that they had the cute owl fabric! My sister in law had mentioned that she wanted a light weight blanket to match her car seat cover. Something she could lay the baby on. So, I got to work! And I discovered that the fabric comes in flannel too!
 I wanted to use minky because it's really soft... and I had a bit of the lighter brown color left over from a project. Just be careful with minky because it's very stretchy... it caused some problems for me and a little unpicking... and the blanket still doesn't lay as flat as I would like it to, but I still think it turned out cute... and it's super soft!
 I wanted to give it a little character so I used bright red thread and did some zig zag stitching along the seams.
 It was super fun to make and I hope baby West loves it!
-Anisa
Sunday, January 16, 2011
Repurposed Twin Bed.... Bench!
A few months ago, a twin headboard and footboard showed up in the garage. I asked my mom what she was doing with them and she said... "making a bench." She began to explain to me that the headboard is the back of the bench, the footboard becomes the sides... so it sat for awhile... and finally this weekend I got my hubby to help me make it into a bench.
 The first thing we did we measured how deep we wanted our bench to be. We wanted it to be 18" deep, so we measured 18" in from each side and marked the wood.
 We then cut the footboard to length.
 We then attached the two footboard pieces to the headboard to form a bench....
 And we needed a place to sit. We used some scrap 1x4's that we had laying around. Make sure your bench pieces are sturdy because.... well, they have to hold your weight.
 We wanted our bench to be about 18" off the ground, so with our design, it worked out to screw the wood into the top board from the bottom.... it all depends on the style of your bed.
 Now I have to paint it....
-Anisa
Now I have to paint it....
-Anisa
Friday, January 14, 2011
Birthday and January Banner
A couple of months ago, I made these cute banners. Well, I need to keep making one for each month. So, here are the last two that I made.
 The "Celebrate" one is mostly for birthdays. I didn't get it made in time for my hubby's b-day in December, but it was finished for my little boy's birthday in January.
 My favorite so far is the January banner. I had some fun die cut felt that I was able to use and I did a lot of stitching!
 I love the colors... red, turquoise and gold... and I love the stitching.
 A couple of close ups...
 I've got my paper for February... now let's see if I can some up with something creative to do with it! --Anisa
Friday, January 7, 2011
A girl for a week
My baby nephew was born on Dec. 23rd with an infection. So, he's been in Primary Children's hospital. We got to baby sit my niece while his mom and dad were in the hospital with him. Aside from the emotions of a girl, I had fun having a girl for a week!
 I tried a few different techniques. All of these flowers were made by simply taking a strip of fabric about 2" wide by 18" long. I started by tieing a knot at the end... the not becomes the center of the flower. Then, you kind of just fold and twist while you hot glue. I'm sure there is some awesome blog out there with a tutorial on these flowers... I was too lazy to try to figure out how to take pictures while my hands were making the flowers.
 This pink flower was made by taking the same strip of fabric. Instead of twisting and hot gluing, I folded it in half the long way. Then I simply took a needle and thread and sewed along the non-folded edge. I gathered as a sewed. Then I sewed a button in the middle.
 This flower was made by taking a piece of fabric about 1.5" wide x 18" long. I simply tore the fabric to give it the shappy chic look. I then used a needle and thread to do a gathering stitch along the edge. I repeated with a piece of fabric 1" x 18" and then sewed the smaller one on top of the larger one. And sewed a button in the middle.
 I think they turned out pretty cute and it was fun to make some flowers out of fabric.... Next up... singed flowers.
 I had fun trying out some photo techniques and fun editing in Iphoto and Photoshop elements.
 Now, I can't wait to go meet my new little nephew!!!
I love cute hair flowers, but I never get the chance to make them because I have 3 boys. So, I got the chance to make a few!
 I tried a few different techniques. All of these flowers were made by simply taking a strip of fabric about 2" wide by 18" long. I started by tieing a knot at the end... the not becomes the center of the flower. Then, you kind of just fold and twist while you hot glue. I'm sure there is some awesome blog out there with a tutorial on these flowers... I was too lazy to try to figure out how to take pictures while my hands were making the flowers.
 This pink flower was made by taking the same strip of fabric. Instead of twisting and hot gluing, I folded it in half the long way. Then I simply took a needle and thread and sewed along the non-folded edge. I gathered as a sewed. Then I sewed a button in the middle.
 This flower was made by taking a piece of fabric about 1.5" wide x 18" long. I simply tore the fabric to give it the shappy chic look. I then used a needle and thread to do a gathering stitch along the edge. I repeated with a piece of fabric 1" x 18" and then sewed the smaller one on top of the larger one. And sewed a button in the middle.
 I think they turned out pretty cute and it was fun to make some flowers out of fabric.... Next up... singed flowers.
Some of these flowers were made specifically to take pictures of this cute little girl....
 I had fun trying out some photo techniques and fun editing in Iphoto and Photoshop elements.
 Now, I can't wait to go meet my new little nephew!!!
Monday, January 3, 2011
Perler Bead Fun Fusion Party
Do you remember Perler Beads from when you were a kid? I remember when I worked in a day care just out of highschool that we made these all the time. Well, my 5 year old really loves them right now! His birthday was today and we thought it would be fun to have a Perler Bead party! I don't usually go all out on birthdays... I'd rather pay for them to go somewhere so that I don't have to do very much work. But I felt the need to have a little fun with this because, well.... it's not Star Wars, Batman, Harry Potter.... you get the idea.
 For the invitations, we used patterned paper and made a frame on it. Then used glue dots to adhere a perler bead design on the front.
 For Decor, we hung perler beads from a jute line across the light fixtures... it turned out so cute, I don't want to take it down!
 We had a fun game of "pin the mouth on the octopus." We printed out a large Perler Bead template from their webite and used that for the game.
 We printed out another picture for a birthday sign.
 And even though I hate cake decorating, I made him a cake that looks like Perler Beads on the template.
 And with the extra batter, we were able to make a few cupcakes which we decorated with... Perler Beads!
 At the end of the day, I have to say, it was fun to be a little creative and think outside the box for his party! - Anisa
Subscribe to:
Posts (Atom)


