 Instructions: Chain 6 with yellow yarn and join with slip stitch into a ring. Chain 1 then 11 single crochet in ring (12 stitches).
Using white yarn continue [11 chain, slip stitch in next single crochet] twelve times in each single crochet from the first round.
Fasten off and weave in ends.
Next, I lightly misted the flower with water and gently stretched and shaped the petals to how I want them to look and let that dry flat.
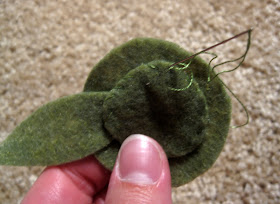
I cut pieces of moss colored felt freehand: one petal and two circles for mounting the flower. I used embroidery floss (1 and 2 ply) to bring it all together.

You may be tempted to use hot glue.
Don't.
Hot glue doesn't like metal, long term. Sewing holds it closer and looks so much better.Sandwich the leaf (make sure it's where you want it in relation to the brooch mounting pin) in between the two circles and whipstitch around the smaller circle, joining all three felt pieces.

I used a size G crochet hook and worsted weight yarn. Any variations with make the flower larger or smaller.
--C


No comments:
Post a Comment