 I love all the possibilities that clay, specifically polymer clay [pc], holds. I've used it for beads, Halloween costume props (I needed a pipe for my Popeye husband), and most recently, a school Halloween project with my son.
I'm going to show you some quick pc basics so that you can have fun with this medium too.
First you're going to need some polymer clay. I use
  Sculpey III. It's the only thing I've ever used or tried. (Remember, I am an amatuer) It comes in a lot of colors, blends well and looks great after baking.
Second, your clay must be conditioned. This basically means kneading it until it's smooth and pliable. This is an important step and will prevent cracking later.
For the flowers I blended clays to achieve the colors I wanted.
  Graduating colors creates a life-like shading on your work, which makes it look great.
When you get the conditioning and colors they way you want them, the third step is to create a cane. A cane is a log of clay with a pattern of color running all the way through.
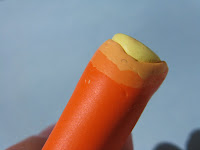
This is a picture of the cane I used for the tiny flower petals. You can see that the center of the cane/log is a light yellow. I then rolled out a sheet of the next color and wrapped it around the yellow core. I did the same with the other two colors. The cane began about as thick as my finger.
The Fourth Step is reducing the cane. this allows you to make your piece smaller without changing the pattern of color. You begin my gently squeezing the cane in the center of that log shape and working outward to the edges. If it is a round shape (like these petals) you can also roll it as you continue to reduce.
When the cane is the size you want you can cut it into smaller canes. I did this and then clustered the canes around a plain, light green log of clay for the center of my flower. Now we have a flower
  cane. It can no longer be reduced as a whole or you'll end up with a colorful log, but not a flower.
After all this kneading, working and shaping, the clay is often too soft to slice immediately off the cane. 5 minutes in the freezer should help with that.
Fifth step: slicing the cane. I use the Sculpey Super Slicer (a very 


No comments:
Post a Comment