Thursday, July 2, 2009

A Simple Gift

Today was my 1st graders last day of school and we wanted to do something special for her teacher. This teacher has fostered such a great love of general learning and specifically reading in my daughter. Normally I like small, simple, inexpensive things, but this year I opted for a nice gift card to Barnes and Noble. Being a crafter, I couldn't just let it go at having my daughter hand her beloved teach a gift card! So-with a little inspiration from my mom and Skip to My Lou, I came up with this cute little flower/sucker bouquet. I cut my flowers using the Cricuit and the George and Basic Shapes cartridge. The suckers are homemade, but you could easily use store bought suckers. Stick the suckers down the middle of the flowers and into a floral foam piece inside the pot. I didn't have any ribbon that coordinated with the flowers, but I did have a different piece of patterned scrap paper that would work. I trimmed it to fit the rim of the flower pot and adhered it with double sided tape. This in itself would make a cute little gift for a friend, teacher, coworker, etc. If you want to add a little gift card though, take a plastic fork, stick your card in, and push the fork handle into the foam as well. As you can see, it looks like the card from the florist.
Cute, easy, and fast. (How fast? I did it this morning as my daughter was getting ready for school. Can we say procrastinator??:) )

If you want to make your own suckers, here's the recipe:

Supplies you'll need:

-candy thermometer

-sucker molds

-sucker sticks

Suckers:

1 c. sugar

1/3 c. light corn syrup

1/2 c. water

1/2 tsp. food coloring (or as desired)

1/2 tsp. flavoring

For fruity flavors: 1/8 tsp. citric acid crystals dissolved in 1 tsp water

Set up sucker molds with sticks on marble slab or aluminum foil. Spray with non-stick cooking spray. Set aside.

Boil water, sugar and corn syrup til about 290 (just before hard crack stage). Remove from heat; add food coloring and stir. Add citric acid if desired. Add flavoring. Stir and pour carefully into sucker molds and allow to cool. Remove gently from molds. Wrap individually or place in Ziploc bag. Enjoy!

Tuesday, June 30, 2009

Free Patriotic Iron-On Downloads

Here's a craft that is practically done for you. We designed some images to put on a t-shirt for your Fourth of July weekend. You just download the images by clicking on the link and print them with your ink-jet printer on to special iron-on transfer paper like this
You can get it online or in any craft or fabric store. These were meant for white t-shirts. To download the image for the God Bless America iron on click HERE To download the image for the America the Beautiful iron-on click HERE
To download the image for the Let Freedom Ring iron-on click HERE --C

Anisa was featured!

Angie and I just wanted to toot Anisa's horn for her and let you know her towel beach bag was featured on U create! Way to go, Anisa!

If you somehow missed her awesome tutorial, click here.

--C

Friday, June 26, 2009

Easy Baby Gifts (with tutorial and free pattern)

First, we have a felt toy. This can be used in a variety of styles. There is a basic oval shape which can be used for a bear or a spaceman (see below) or a monkey or a rabbit. Endless possibilities...First gather yourself a bunch of felt. I used for a template my Creative Memories cutting templates and traced them with a fading fabric marker. The measurements of the ovals are: Bear is 6 3/4" x 4 1/2" and Spaceman is 5 3/4" x 3 1/2" (starting dimensions).
Before cutting begins, draw a single antennae or ear for what ever you're making. Cut around the shape, but only until you can match up the widths' ends and trace around the one cut out antennae or ear so that you have a matching set (I use this method because it's hard to get a matching set, especially free-hand as I like to do).
Cut out the same shape out of another color for the back, but do not cut out the smaller inner circle. Choose a piece for the face (it doesn't have to be pretty) and free-hand cut out some hair for the spaceman, or none for the bear. Then line them all up, pin together and front sew them all together with just a tiny seam. Draw a face on the felt with your fading fabric marker and embroider it BEFORE you sew the piece together.
Place right sides together, pin and sew with a 1/4" seam.
Stuff it (sorry, switching to the bear) with Poly-fil AND the secret ingredient...a used baby-wipes wrapper or other crinkle-y, plastic-y type item (not shredded, whole, for safety) and give the baby the noise he wants!
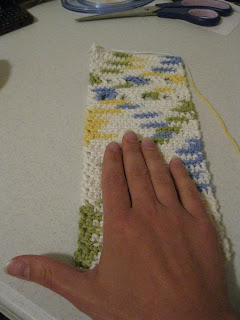
Second item: a crocheted baby wash-mitt.
Using COTTON yarn (I used The Original Sugar 'n Cream cotton yarn in Cool Breeze Ombre) and a size H hook, chain 21.
Turn and single crochet (sc) in first chain from hook and in every chain across.
*Chain one, turn and single crochet in first sc from hook and in every sc across.
Repeat from * approx. 44 more rows (total 46) or the measurement of the adult had it will fit with the crocheted strip folded in half. After the strip is at the desired length, do not finish off, but leave approximately 32" of extra yarn attached. Pull it through the last sc so the strip doesn't unravel. Thread the yarn into a large eye needle, fold the strip in (over the hand) and whip stitch up on side. So that we don't have to cut the yarn and weave in multiple ends, lead the yarn over the top of the mitt uniformly in the loops all the way across, then whip stitch down the other side. Weave in any stray ends and your mitt is done. Put it over the top of a bottle of baby wash and it makes a charming gift. (If you want a bit more of a decorative touch, I replaced two sets of two rows with one row each of double crochet following a pattern (from the regular sc row) chain two, double crochet in first sc from hook. Double crochet in next two sc, *chain two, skip next two sc, double crochet in next two sc. Repeat from * three more times (end) then continue the sc pattern. I only recommed the decoration for the back of the mitt and not the front where you'd use to wash baby. )
email us with any questions: twiddlethumbs@rocketmail.com
--C

Wednesday, June 24, 2009

Beach Towel Bag Tutorial

Beach Towel Bag Tutorial....
Supplies:
  • 1 Beach Towel (I bought the cheapest at Walmart)
  • 5 yards gros grain ribbon (just to be safe)
  • Sewing machine
  • Thread to match ribbon
Step #1- Fold the towel in half
Step #2- From the open side, measure in 22" and cut the towel (You are essentially cutting out the center of the towel. The excess that you cut off will make a pocket for the front of the bag) Step #3- Turn the towel and cut off about 4-5 inches of one side of the towel (otherwise the bag is just TOO big). You may want to serge or zig zag stitch any of the unfinished edges of the towel. Step #4- Now take the excess piece that you cut out of the center of the towel. This is going to be a pocket. The top of the pocket is going to be one of the edges that is already finished. From that end, measure down 18" and cut the other edge off. Step #5- Take the pocket and place it on one of the pieces of your bag. You will want all of the finished edges to be at the TOP of the bag. You will want your pocket to be about 5-6 inches down from the top of the bag. You are going to sew ribbon over the sides of the pocket so that none of the unfinished portion will show. Pin the pocket into place. Step #6- Sew the pocket onto the bag. Do NOT sew the top of the pocket (or you won't be able to put anything in your bag:) (I had a little excess on the bottom that I had to cut off only because I wanted the pattern to match up) Step #7- Place right sides of the towels together and pin just the bottom of the bag.
Step #8- Sew the bottom of the bag... do NOT sew any of the sides or the top.  You still want to be able to open it up fully to attach the ribbon. Step #9- open your bag up and lay it front side up on the floor or on a table. Step #10- Pin your handles all around your bag. I made the actual handle part of the bag 32". You will want to make sure the ribbon covers the side of your pockets. Step #11- Sew right on the edge of your gros grain ribbon... sew both sides. Step #12- Fold the towel right sides together. Step #13- Sew down the side of your bag (starting at the top) until you are about 6-8 inches from the bottom of the bag. Step #14- Open up the part you didn't sew and ... ...put that part together. Step #15- sew the open part together. (I hope these pictures make sense) Do this on both sides of the bag. It just makes a flat bottom to the bag. Step #16- Flip your bag right side out and you will have an awesome bag to take to the pool!!! Please feel free to email me at twiddlethumbs@rocketmail.com if you have any questions.
-Anisa

Monday, June 22, 2009

1 Craft 3 Ways- Travel Bag!!!

For our 1 Craft-3 Ways this month we decided to do some type of bag that you could use on a vacation. I have always wanted a HUGE swimming bag. We go swimming a lot and I need a bag big enough to hold 5 towels, 5 swimming suits, cover ups, life jackets, toys, etc..... that's a lot of stuff! So, when Angie made her placemat purse, I thought I could kind of do the same thing with a beach towel and make a BEACH TOWEL BAG. It took a little trial and error because the first bag a made was just tooooo huge. But I think I have perfected the process.

Look for my tutorial on how to make this awesome bag on Wednesday!! -Anisa

>><<
This little baby has been on my craft to-do list for sometime.
I knew it would be the perfect little tote for vacation for my kids (and me too). Then I started seeing little reusable sandwich bags popping up here and there. A perfect match. A water bottle holder paired with a reusable treat bag. LOVE it. I got the tutorial for the holder here at Pink Chalk Studio (via Ucreate). The treat bag is of my own design. (Hey-sometimes reinventing the wheel is much more fun than following the directions.) In order to make it day-out friendly, I attached some grommets (a.k.a. eyelets) to both the treat bag and the holder and fastened them together with a key ring (the kind that pull open). Now the kids can carry their own water AND their own snack. Brilliant!

Watch for a tutorial soon on making your own reusable treat bags!-Ang

>><<
I had no idea what I'd do for a travel bag until my friend Rachel mentioned she liked a bag that another friend had and that she'd love a similar one herself for a writer's conference attending. Like a true crafter I blurted out: "We could make that!" and I did. I got the original concept from this pattern, but enlarged it somewhere in the 25-30% range. I also designed interior pockets to fit the user's purpose better. (If you'd like clearer pattern instructions that the link, email us and I'd be happy to provide them.)

The finished bag was about 18" x 13", enough to fit legal length writing pads and a larger laptop. The hidden closures were also my design (along with some other cosmetic changes). Buttons are sewn to the main body of the bag and coordinating button-hole straps are sewn on the inside of the flap. Being only my second challenging sewing project, I'm pleased it turned out so well and as requested: serious on the outside, fun and girly on the inside! --C

Friday, June 19, 2009

Waterproofing My Kids

My family has been planning an awesome road trip for the end of summer. Two weeks on the road, DVD players, salty sea air, fresh fish, GORGEOUS scenery, and rain. The problem? We're desert dwellers. With the exception of the strange rainy season Salt Lake just experienced, we don't do rain. Not that we don't like it. We do. We just have no protection from the wetness besides an umbrella (or rain-brella as my 2-year-old calls it). As our vacation has a great possibility of being damp for a good portion of the time, I figured my kids will need rain jackets. Luck was on my side. I found these adorable little rain coats at Target (on clearance even!). I got them home and made my kiddos try them on immediately. Sadly, the jackets were too short in the sleeves on two of my 3 kids. Here's how I solved my problem for about $1 per jacket. The jacket: I bought 2 different colors of ribbon (by the yard-1 1/2" wide on both pieces). Measure around the cuff of the sleeve and add a little for your seam.** Since I was using 2 pieces of ribbon, I glued them together using my favorite glue, E6000. Starting at the inside seam of the sleeve, I glued the ribbon all the way around. Add a little embellishment. That's it. When I showed my hubby after one sleeve, he didn't realize I was showing him the "finished" side. He was amazed. (And why shouldn't he be?? ;) ) The best part is it fits her!! **To give your grosgrain ribbon a finished look on the raw edges, I used a propane lighter (like the ones for your grill) to burn the edge. No more fraying!

Monday, June 15, 2009

The world is a book and those who do not travel read only one page.

In my own haste to get ready for a first-time trip to New York City, I forgot to add our brand-new feature to the blog. Before you read the rest of this post, take a gander over to the top of the left column to see our new Creative Concept corner. Sometimes, you just need a small word or idea to send you into a great creative mindset. This month the theme is: travel. So many of us have recently traveled or are about to go on our summer vacations and there are a lot of ways crafts can make your trips easier or more fun.

This very theme inspired my craft for today. It was also inspired by an odd book called The Big-A** Book of Crafts by Mark Montano, pages 142-143. The author says to laminate a color copy of a map, cut it to the desired size, punch a hole in the corner, thread a key ring through it, write your info on the other side.

It sounds easy, but I think I've made it even easier (and less sharp around the edges).

I used these great easy-to-use Photo Laminating sheets from 3M.

I printed off a map of where we spent our recent vacation from Yahoo. I wrote my info on the reverse side and even added the quote I put in the title of this post. I glued the map and info back to back and slipped it into one of these sheets. Easy! I then cut a small slit in the top and threaded an unused hair elastic through the slit to attach it to my luggage. I even added a small ribbon for good measure and to cover the metalic connector on the elastic.

The finished product:

-C