


 First gather yourself a bunch of felt.
 I used for a template my Creative Memories cutting templates and traced them with a fading fabric marker. The measurements of the ovals are: Bear is 6 3/4" x 4 1/2" and Spaceman is 5 3/4" x 3 1/2" (starting dimensions).
 Before cutting begins, draw a single antennae or ear for what ever you're making. Cut around the shape, but only until you can match up the widths' ends and trace around the one cut out antennae or ear so that you have a matching set (I use this method because it's hard to get a matching set, especially free-hand as I like to do).
 Cut out the same shape out of another color for the back, but do not cut out the smaller inner circle. Choose a piece for the face (it doesn't have to be pretty) and free-hand cut out some hair for the spaceman, or none for the bear.
 Then line them all up, pin together and front sew them all together with just a tiny seam.
 Draw a face on the felt with your fading fabric marker and embroider it BEFORE you sew the piece together.
 Place right sides together, pin and sew with a 1/4" seam.

Stuff it (sorry, switching to the bear) with Poly-fil AND the secret ingredient...a used baby-wipes wrapper or other crinkle-y, plastic-y type item (not shredded, whole, for safety) and give the baby the noise he wants!

Second item: a crocheted baby wash-mitt.

Using COTTON yarn (I used The Original Sugar 'n Cream cotton yarn in Cool Breeze Ombre) and a size H hook, chain 21.
Turn and single crochet (sc) in first chain from hook and in every chain across.
*Chain one, turn and single crochet in first sc from hook and in every sc across.
Repeat from * approx. 44 more rows (total 46) or the measurement of the adult had it will fit with the crocheted strip folded in half.
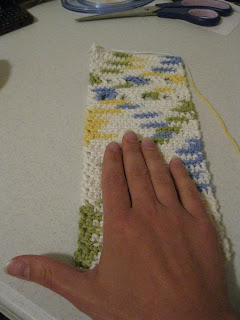 After the strip is at the desired length, do not finish off, but leave approximately 32" of extra yarn attached. Pull it through the last sc so the strip doesn't unravel. Thread the yarn into a large eye needle, fold the strip in (over the hand) and whip stitch up on side.
 So that we don't have to cut the yarn and weave in multiple ends, lead the yarn over the top of the mitt uniformly in the loops all the way across, then whip stitch down the other side.
  Weave in any stray ends and your mitt is done. Put it over the top of a bottle of baby wash and it makes a charming gift.
 (If you want a bit more of a decorative touch, I replaced two sets of two rows with one row each of double crochet following a pattern (from the regular sc row) chain two, double crochet in first sc from hook. Double crochet in next two sc, *chain two, skip next two sc, double crochet in next two sc. Repeat from * three more times (end) then continue the sc pattern. I only recommed the decoration for the back of the mitt and not the front where you'd use to wash baby. )
After the strip is at the desired length, do not finish off, but leave approximately 32" of extra yarn attached. Pull it through the last sc so the strip doesn't unravel. Thread the yarn into a large eye needle, fold the strip in (over the hand) and whip stitch up on side.
So that we don't have to cut the yarn and weave in multiple ends, lead the yarn over the top of the mitt uniformly in the loops all the way across, then whip stitch down the other side. Weave in any stray ends and your mitt is done. Put it over the top of a bottle of baby wash and it makes a charming gift.
 (If you want a bit more of a decorative touch, I replaced two sets of two rows with one row each of double crochet following a pattern (from the regular sc row) chain two, double crochet in first sc from hook. Double crochet in next two sc, *chain two, skip next two sc, double crochet in next two sc. Repeat from * three more times (end) then continue the sc pattern. I only recommed the decoration for the back of the mitt and not the front where you'd use to wash baby. )
email us with any questions: twiddlethumbs@rocketmail.com
--C


 Look for my tutorial on how to make this awesome bag on Wednesday!! -Anisa
  I knew it would be the perfect little tote for vacation for my kids (and me too). Then I started seeing little reusable sandwich bags popping up here and there. A perfect match. A water bottle holder paired with a reusable treat bag. LOVE it. I got the tutorial for the holder
  I got the original concept from
  Being only my second challenging sewing project, I'm pleased it turned out so well and as requested: serious on the outside, fun and girly on the inside!
--C
Being only my second challenging sewing project, I'm pleased it turned out so well and as requested: serious on the outside, fun and girly on the inside!
--C
 I bought 2 different colors of ribbon (by the yard-1 1/2" wide on both pieces). Measure around the cuff of the sleeve and add a little for your seam.**
 Since I was using 2 pieces of ribbon, I glued them together using my favorite glue, E6000.
 Starting at the inside seam of the sleeve, I glued the ribbon all the way around.
 Add a little embellishment.
 That's it. When I showed my hubby after one sleeve, he didn't realize I was showing him the "finished" side. He was amazed. (And why shouldn't he be?? ;) ) The best part is it fits her!!
**To give your grosgrain ribbon a finished look on the raw edges, I used a propane lighter (like the ones for your grill) to burn the edge. No more fraying!
That's it. When I showed my hubby after one sleeve, he didn't realize I was showing him the "finished" side. He was amazed. (And why shouldn't he be?? ;) ) The best part is it fits her!!
**To give your grosgrain ribbon a finished look on the raw edges, I used a propane lighter (like the ones for your grill) to burn the edge. No more fraying!

 I glued the map and info back to back and slipped it into one of these sheets. Easy! I then cut a small slit in the top and threaded an unused hair elastic through the slit to attach it to my luggage. I even added a small ribbon for good measure and to cover the metalic connector on the elastic.
 -C
-C

 I used that old taupe cover as a template to cut out my felt. I kept the width the same, but increased the length a bit to allow for folding it in half, etc.
The embellishment is just embroidery and a bit of applique. It took me just over twenty minutes of actual work to make this happen.
I used that old taupe cover as a template to cut out my felt. I kept the width the same, but increased the length a bit to allow for folding it in half, etc.
The embellishment is just embroidery and a bit of applique. It took me just over twenty minutes of actual work to make this happen.





 Posts
Posts


