Friday, January 14, 2011

Birthday and January Banner

A couple of months ago, I made these cute banners. Well, I need to keep making one for each month. So, here are the last two that I made. The "Celebrate" one is mostly for birthdays. I didn't get it made in time for my hubby's b-day in December, but it was finished for my little boy's birthday in January. My favorite so far is the January banner. I had some fun die cut felt that I was able to use and I did a lot of stitching! I love the colors... red, turquoise and gold... and I love the stitching. A couple of close ups... I've got my paper for February... now let's see if I can some up with something creative to do with it! --Anisa

Friday, January 7, 2011

A girl for a week

My baby nephew was born on Dec. 23rd with an infection. So, he's been in Primary Children's hospital. We got to baby sit my niece while his mom and dad were in the hospital with him. Aside from the emotions of a girl, I had fun having a girl for a week!

I love cute hair flowers, but I never get the chance to make them because I have 3 boys. So, I got the chance to make a few!

I tried a few different techniques. All of these flowers were made by simply taking a strip of fabric about 2" wide by 18" long. I started by tieing a knot at the end... the not becomes the center of the flower. Then, you kind of just fold and twist while you hot glue. I'm sure there is some awesome blog out there with a tutorial on these flowers... I was too lazy to try to figure out how to take pictures while my hands were making the flowers. This pink flower was made by taking the same strip of fabric. Instead of twisting and hot gluing, I folded it in half the long way. Then I simply took a needle and thread and sewed along the non-folded edge. I gathered as a sewed. Then I sewed a button in the middle. This flower was made by taking a piece of fabric about 1.5" wide x 18" long. I simply tore the fabric to give it the shappy chic look. I then used a needle and thread to do a gathering stitch along the edge. I repeated with a piece of fabric 1" x 18" and then sewed the smaller one on top of the larger one. And sewed a button in the middle. I think they turned out pretty cute and it was fun to make some flowers out of fabric.... Next up... singed flowers.

Some of these flowers were made specifically to take pictures of this cute little girl....
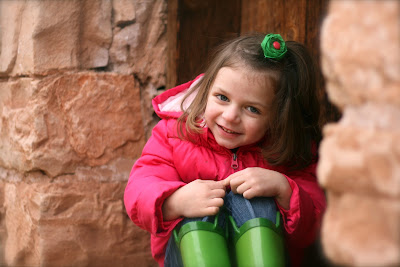
I had fun trying out some photo techniques and fun editing in Iphoto and Photoshop elements. Now, I can't wait to go meet my new little nephew!!!

Monday, January 3, 2011

Perler Bead Fun Fusion Party

Do you remember Perler Beads from when you were a kid? I remember when I worked in a day care just out of highschool that we made these all the time. Well, my 5 year old really loves them right now! His birthday was today and we thought it would be fun to have a Perler Bead party! I don't usually go all out on birthdays... I'd rather pay for them to go somewhere so that I don't have to do very much work. But I felt the need to have a little fun with this because, well.... it's not Star Wars, Batman, Harry Potter.... you get the idea. For the invitations, we used patterned paper and made a frame on it. Then used glue dots to adhere a perler bead design on the front. For Decor, we hung perler beads from a jute line across the light fixtures... it turned out so cute, I don't want to take it down! We had a fun game of "pin the mouth on the octopus." We printed out a large Perler Bead template from their webite and used that for the game. We printed out another picture for a birthday sign. And even though I hate cake decorating, I made him a cake that looks like Perler Beads on the template. And with the extra batter, we were able to make a few cupcakes which we decorated with... Perler Beads! At the end of the day, I have to say, it was fun to be a little creative and think outside the box for his party! - Anisa

Saturday, January 1, 2011

A few homemade Christmas gifts

In my family, we rotate who we give Christmas gifts to. When I asked my brother and sister-in-law what they wanted, they told me a gift card to Walmart. How boring! But, I know better than to give my brother anything other than what he asked for. However, I just couldn't give them a gift card without giving them some cute hand made gifts to go with it. They have a little girl who is 3 1/2. So, I thought I would make a cute hair clip for her.But, they were expecting a baby boy (he was born Dec. 23rd). I couldn't figure out what to make him. I debated on burp cloths and bibs.... but I finally decided on a binky holder. I just put a simple brad on the end to hide the clip... and I love it when I can purchase something for a gift for someone and have a bunch of fun stuff left over for me! One of the fun parts of giving gifts is the packaging. One of the things that makes it cute is when you use something from the gift to decorate the packaging... I used the ribbon from the binky clip and a scrap of fabric from the hair clip to tie the cellophane bags. It adds a fun touch to the gifts. Our little nephew has been in Primary Children's hospital with an infection and we haven't even been able to meet him yet! He is improving a ton but won't be out until the round of antibiotics is over (in another week). I can't wait to meet him! In the meantime, we are baby sitting my niece... I have been making more hair flowers and have plans to make a few more.... I don't get the chance to make girly stuff all that often!

I hope everyone had a Merry Christmas and a Happy New Year!!!

-Anisa

Wednesday, December 22, 2010

Scary snowmen?

Is it just me or are these the scariest snowmen you've ever seen? I just don't think snowmen should have faces! (This is just the opinion of Anisa... no offense intended)

Sunday, December 12, 2010

Christmas Cards

They are starting to come... all of those fun Christmas Cards! I love getting Christmas cards... especially from people I haven't seen in a long time! I used to throw them away at the end of the year.... gasp! But a couple of years ago, I decided to save them. It's fun to see how families change and grow over the years. And it also helps me to not forget someone on my Christmas card list.
I didn't want to put them in a photo album... I wanted to save some space. So, I made an envelope to put them in. I used my Platin Schoolbook Cartridge on my Cricut and cut out an envelope. To make it big enough to hold all of my cards, I actually sewed two 12x12 pieces of cardstock together to make a 24"x12" piece of paper. Then I cut the envelope as big as it would go! The sewing is on the back and it adds a cute effect. Last year I jazzed it up a little by putting my own families photo card on the front. I made a tie closure on the back by using 2 eyelets and a card stock circle. (Up-close view) If you don't have a cricut, you could find an envelope template online or just purchase a manila envelope and decorate it!
-Anisa

Tuesday, December 7, 2010

Ornamental Creativity: Using What You Have

My mom is kind of old-fashioned... to say the least. But she does have some really crafty creative ideas. I thought this idea was super cute, so I wanted to share. She took candle sticks... and instead of putting candles in them, she put ornaments! She's going with a gold and red thing... and she loves brass, but this is a great idea. You could use any type of candle sticks that you like. I think it would be really cute as a table centerpiece.

Sunday, December 5, 2010

Another use for "Glossy Accents"

So, the other day we found a baby scorpion in our bedroom.... eeeeek!!!
My little boys were quite fascinated with it. Brenner wanted to take it to school for show and tell. I wanted to protect this little guy while he was being passed around to 25 first graders. So, I thought back to Cami's posts on Twiddle Thumbs where she used Glossy Accents to make necklace pendants.

I have the stuff on hand from making cute magnets like these...
(These are not my magnets... because I've never taken a picture of them... I stole this pic from this Etsy Shop.)
So, I took the little guy and put him on a piece of cardstock. Then I squeezed a generous portion of Glossy Accents over him... I wanted to cover him and protect him. It worked out really well. He was covered, protected and ooohed and aaaahed over by 25 first graders.
-Anisa